This 'Top Roping' article is part of the book - Trad Climbing Basics.
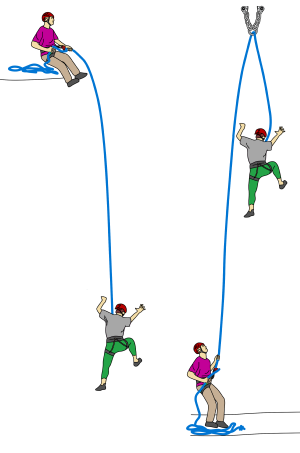
With the security of an anchored rope above, top-roping is the safest way to climb. A top-roped climber can rest on the rope whenever they are too tired to continue, safe in the knowledge that they will only fall a few inches. Top-roping is great for beginners, large groups or for experienced climbers who want to push their physical limits.
Forces
Forces on gear when top-roping are much less than forces on gear during a leader fall. However, with a little slack in the system, the force at the anchor could exceed several times the combined weight of the climber and belayer. The anchor needs to be bomber.
Lowering
When belaying from the top, the climber is often lowered down and then climbs out. If possible, it can be much better to belay directly from the anchor. This keeps the climber’s weight off the belayer’s harness.
If lowering is impractical (e.g: it could damage the rope or it’s difficult to communicate when to stop being lowered), the climber could abseil down instead. This could be on the same rope, or a separate one. Plan logistics well before descending.
Top or Bottom?
Depending on the terrain, the length of your rope and the anchor arrangement, you may choose to belay from the top or the bottom of the crag.
Belaying from the bottom:
- Makes it easier to switch between climbing and belaying.
- Generally creates a more social setting.
- Makes communication clearer.
Belaying from the top can be better if:
- The bottom of the crag is difficult or impossible to access (e.g: the last pitch of a tall cliff).
- There is a chance of a climber knocking rocks on the belayer.
- The crag is higher than half a rope length.
Setting Up the Anchor
Be careful when walking around the top of a crag un-roped. You may need to make an anchor further back from the cliff edge and then be put on belay while you set up the top-rope anchor.
Top Roping > How To Set Up the Anchor
Step 1
Find enough good gear placements directly above the route to make an anchor, making sure they meet the requirements of the six point rule.
Step 2
Equalize them together with slings, cordelettes or a section of static rope to create a central point which fulfils the criteria in the anchor check list.
Remember that the top roping anchor will be out of sight and not consistently weighted while you are climbing. This means you will have to build it with gear that cannot wiggle out of position with movements in the rope.
Step 3
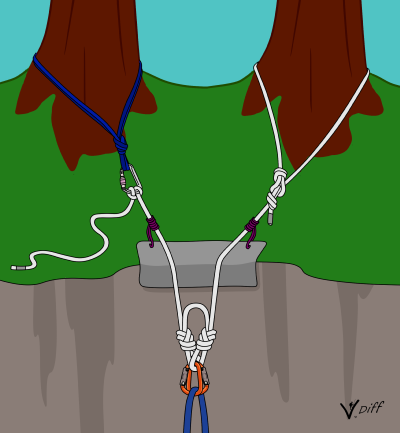
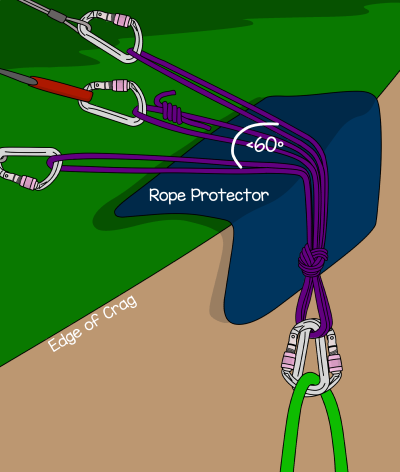
Extend the central point over the edge of the crag, if it isn't already. Static rope is the best for this, but you can also use nylon slings or a thick cordelette. Make sure to double up the slings or static rope which extend the anchor over the edge.
Step 4
Place a rope protector over any rough edges. An old piece of carpet, foam pads or garden hose pipes (without metal lining) make good rope protectors.
Step 5
Clip the middle of the rope to the central point with two screwgates. Make sure the screwgates are opposite and opposed (they are facing opposite ways and the screws twist downwards to fasten them).
