This article is part of the book - Sport Climbing Basics.

Lower, Abseil or Walk Off?
There are basically three ways to descend; walk off, lower or abseil (rappel). You will either lower or abseil to get down from most sport routes. Your choice largely depends on the type of anchor, how it is positioned and what you plan to do after the climb.
Lowering from a sport anchor is quicker than abseiling. It’s also much easier to retrieve gear on your way down when lowering. However, abseiling puts much less wear on the rings and your rope. This could be the best option if the rings are already showing signs of wear.
If the next climber is going to top-rope the route, you should make an anchor from your own gear and lower down from that.
If you are the last person to climb the route, you’ll need to clean all your gear from the anchor before you descend.
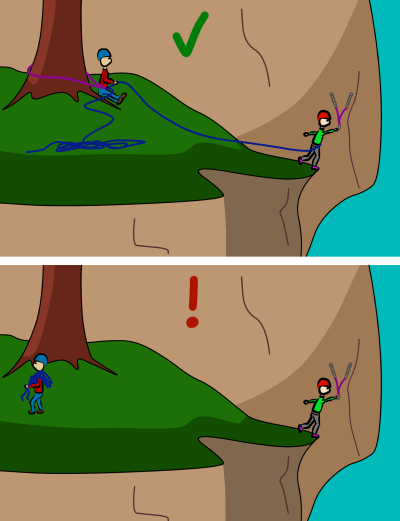
For anchors which are in a poor position for lowering or abseiling (e.g: far back across a ledge), it is much better to belay your partner from the top of the climb. You can then walk off.
Walking Off
When walking off is a common descent method, there will usually be an established trail back to the base.
Make sure to always be securely connected while cleaning the anchor. You will often have to do a ‘mini pitch’ in order to reach safe walking terrain. If you plan to walk off, make sure to bring a couple of long slings so you can make an anchor (such as slings around a tree) for this purpose.
Best Situation To Walk Off
- When the anchor is situated in such a way which means lowering or abseiling would be difficult or dangerous (e.g: far back from the top of the crag or on a ledge covered in loose blocks).
Lower Off
Lowering is the simplest method of descent.
You Will Need:
* Two spare quickdraws
Best Situation To Use this Method
- When someone else will lead the climb after you
- When you plan to leave all your quickdraws on the bolts for the next climber
Warning!
Only lower down like this if you are leaving your quickdraws on the bolts in the pitch for someone else to lead next. The highest lead quickdraw acts as a back-up in case your anchor draws unclip as you descend. It is dangerous to lower down or top-rope from only two quickdraws. If you want to remove the quickdraws on your way down, you’ll need to either set up a top rope anchor or clean the anchor.
Step 1
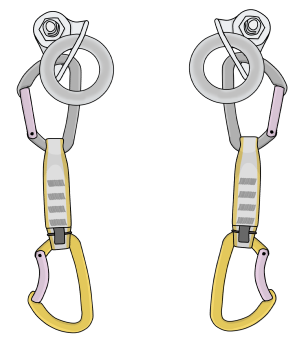
Clip a quickdraw into each bolt. Make sure the rope-end carabiners have their gates facing outwards.
If there are chains or rings on the bolts, clipping your quickdraws underneath puts them in a better orientation.
Step 2
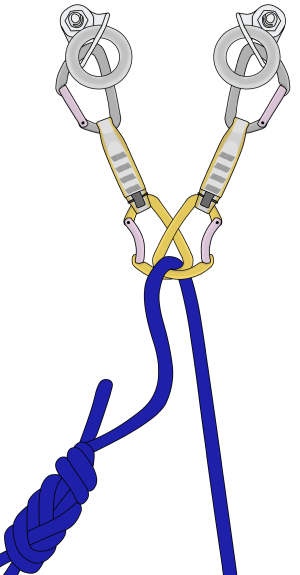
Clip the rope through the quickdraws from the back so the rope is coming out towards you.
Step 3
Ask your belayer to take you tight. You are now ready to lower.
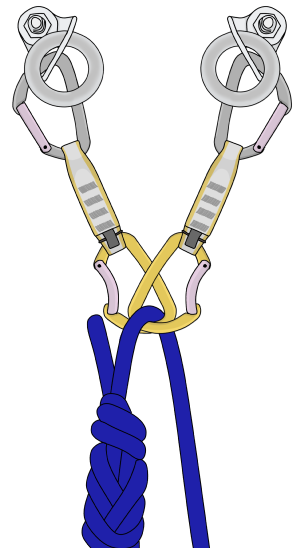
Removing Quickdraws
If you have cleaned the anchor, but your quickdraws are still in the route, you’ll need to retrieve them on your way down.
This is easy on a straight-lined, vertical route. Simply lower down and unclip them from the bolt and the rope.
The belayer will need to stop lowering you at each bolt so you have time to do this.

Overhanging Routes
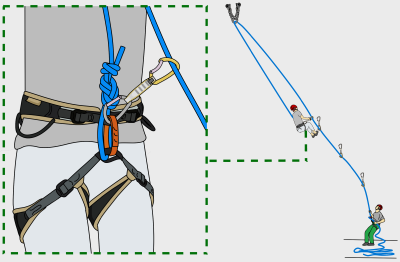
Removing quickdraws is more difficult on overhanging or traversing routes. To make it easier, clip one end of a quickdraw to your belay loop and the other end to the rope. This ‘lowering quickdraw’ keeps you in the same line as the route while you descend.
On your descent, unclip the lead quickdraws from the rope and then from the bolts.
Removing the Last Quickdraw
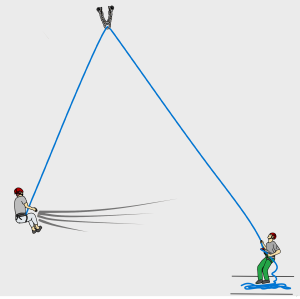
Be careful when removing the last quickdraw. If you remove it in the same way as the others, you’ll swing out from the rock and pull your belayer with you.
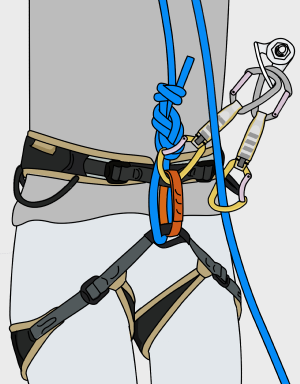
Step 1
If it is a safe swing (i.e: you wouldn’t hit anything or anyone), unclip your lowering quickdraw from the rope and attach it directly to the bolt. Then allow your weight to hang on this quickdraw.
Step 2
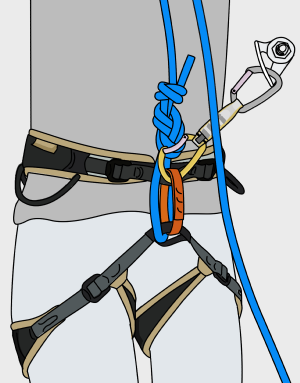
Remove the other quickdraw from the bolt and the rope.
Give your belayer time to take in the extra slack which is created.
Step 3
Remove the last quickdraw from the bolt.
To make this easier, use holds on the rock to pull yourself in. Be ready to swing out!
Warning!
Be careful when removing the last quickdraw. If you remove it in the same way as the others, you’ll swing out from the rock and pull your belayer with you.
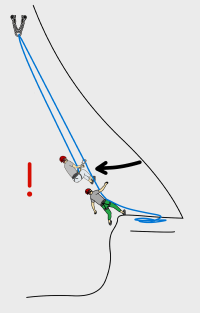
Warning!
Make sure the swing is safe.
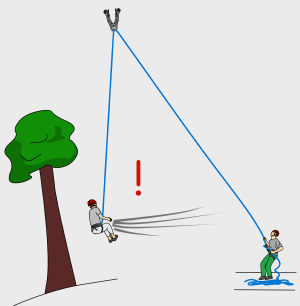
If it isn’t a safe swing, lower to the ground as shown below, and then climb up to retrieve the quickdraw.
This works best if you have a bouldering pad and the first bolt isn’t very high.
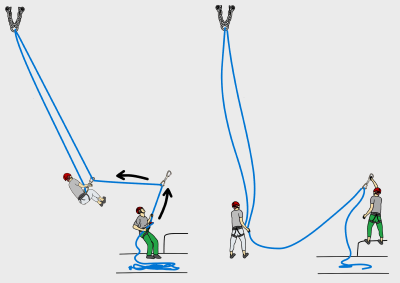
Clipping into Quickdraws
If you have top-roped an overhanging or traversing route, and someone else wants to top-rope after you, you’ll need to clip the rope to some of the quickdraws on your way down as ‘directionals’. These directionals stop the next climber from swinging wildly across the rock if they fall.
Simply clip your rope into the quickdraws as you lower. Depending on the route, you may need to clip them all, or just a couple.
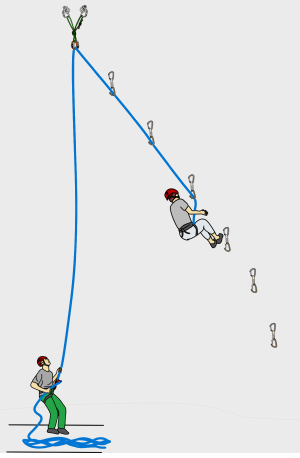
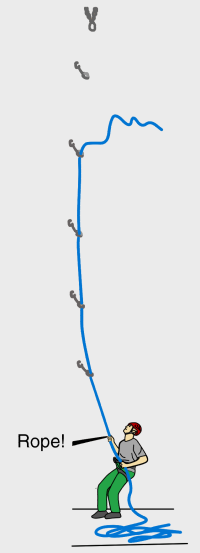
Pulling the Rope Down
Untie any knots from the rope before you pull it down.
Shout 'rope' before it falls so everyone around you is expecting it – a falling rope in the head hurts!
Pull the rope so the falling end drops down through the quickdraws (if you are leaving them in). This will slow it down and make it safer.
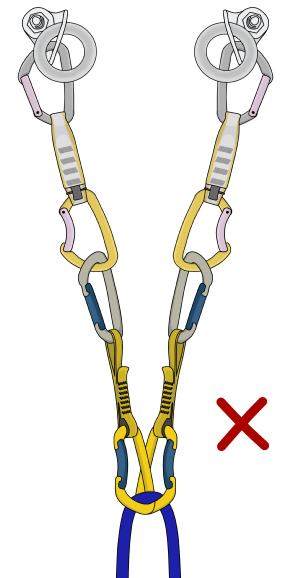
Extending the Anchor
Never connect quickdraws together like this.
If you need to extend the anchor for lowering or any other reason, make sure to use a sling or cordelette instead, as described here.
Abseiling
The following description is for abseiling on a single rope where the descent is less than half of your rope’s length. For longer abseils, you’ll need two ropes. Learn more about abseiling.
Best Situations To Abseil
- If the lowering rings are already showing signs of wear (Abseiling puts much less wear on the rings than lowering).
- If your rope would rub across rough edges when lowering.
Attaching Your Belay Device and Prusik
Step 1
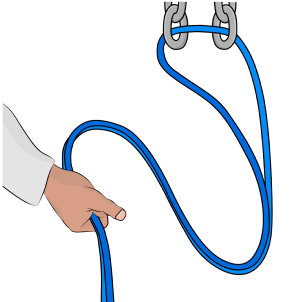
Attach yourself to the anchor and feed the rope through the main abseil point, as shown.
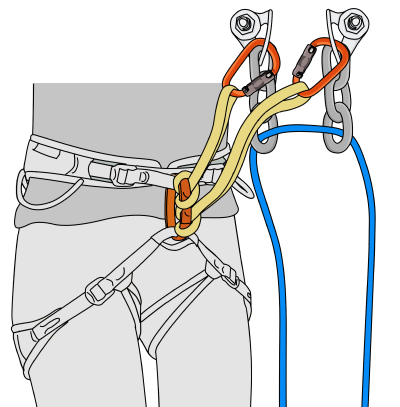
Step 2
Clip your belay device to your belay loop with a screwgate (don’t lock it yet).
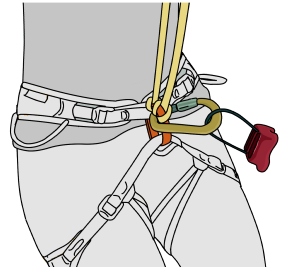
Step 3
Pull up about a meter of both strands of rope.
It will be heavy, so step on it to create slack so it’s easier to clip in.
Step 4
Push the ropes through your belay device making sure it is orientated the correct way up.
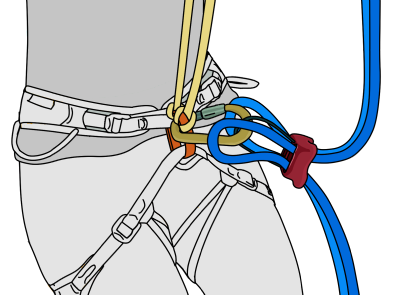
Step 5
Clip both of the ropes and your belay device through the screwgate carabiner and fasten it.
You don't need to remove the screwgate from your belay loop when doing this; you are more likely to drop it if you do.
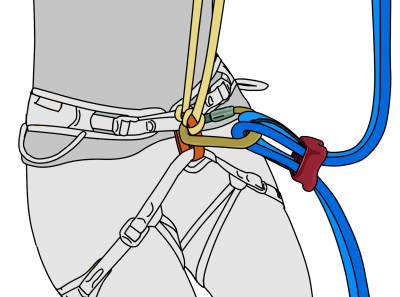
Step 6
Lean into the anchor and pull any slack rope through your belay device.
Holding the ropes in the lock-off position, sit back and apply your weight to the belay device. This allows you to easily check the setup.
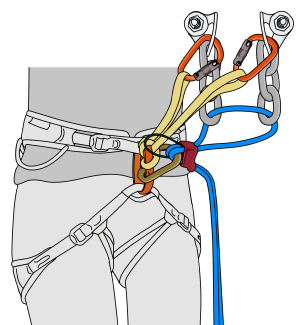
Step 7
For most abseils, it's wise to backup with a prusik knot. A correctly tied prusik will auto-lock if you let go of the ropes.
Wrap the prusik around both ropes a few times and then clip the ends together with a screwgate carabiner. More wraps will create more friction around the ropes, though four wraps are generally enough.
Pull the knot tight, make sure it is neat and the double fisherman’s knot is away from the ropes.
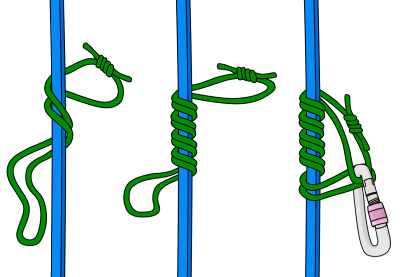
Step 8
Clip the prusik to your leg loop. The prusik will slide down the ropes if you hold it close to your leg loop and lock around the ropes if you let go. Test this before you abseil.
If it doesn't lock, take it off and re-tie it with an extra wrap around the ropes.
Prusik Too Long?
If your prusik loop is too long, it's possible that it could jam into your belay device during the abseil. If this happens, it can be difficult to control your descent. To avoid this, you can extend your belay device with a sling.
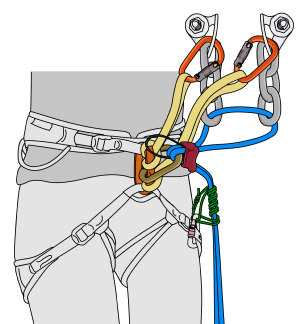
Abseiling - Check The System
Before you unclip your attachment point from the anchor, check:
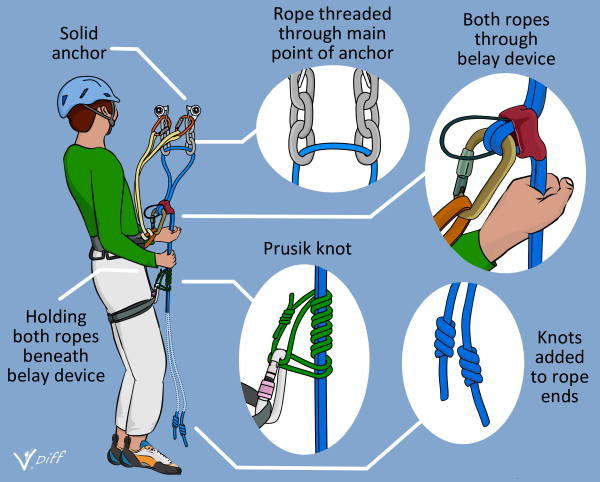
Abseiling - The Descent
Step 1
With one hand holding both ropes in the lock-off position, unclip your slings from the anchor.
You can clip them out of the way on the back of your harness.
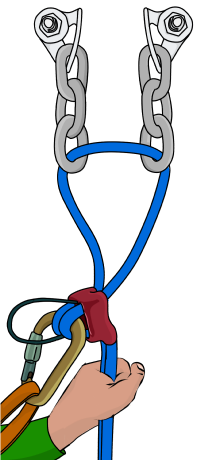
Step 2
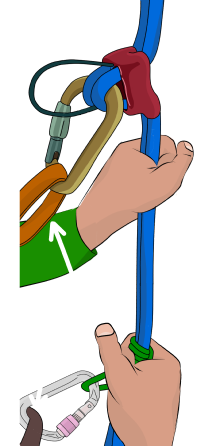
Put your second hand over the prusik. Your hands should be in the same position as they would to lower a climber while belaying.
Step 3
While keeping a firm grip, lean your weight back and allow some rope to go through your belay device, remembering to slide the prusik down as you go.
Continue feeding rope through as you lower yourself down.
It takes a little practise, but you'll soon be able to figure out how fast to feed the rope while staying in control.
Step 4
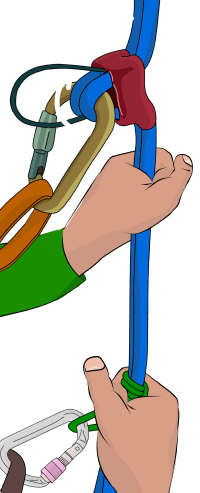
Sit back in your harness and keep your body in an L shape with your feet wide apart. Walk backwards down the rock, making sure to look behind to see where you're going. Move smoothly down the ropes. Don’t bounce, jump or swing around – this puts much more force on the anchor and is likely to damage your ropes if they pass over rough edges.
To abseil past a roof, plant your feet on the lip and lower your body down. Once your body is below the roof, cut your feet loose to avoid hitting your head. Keep going until you've reached the ground.
Step 5
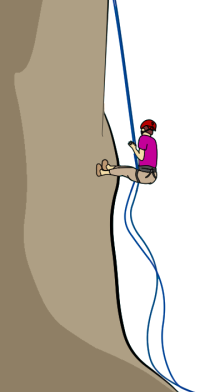
Remove your abseil device, unfasten any knots from the ends of the rope and pull down on one side.
Keep an eye on the other end of the rope as you do this to make sure it doesn't go up with a mysterious auto-knot fastened in it.
When the ropes are about to fall down, shout ‘rope’ to warn people who are nearby. Be aware that the falling rope may bring down loose rock with it.
Abseiling - Top Tips
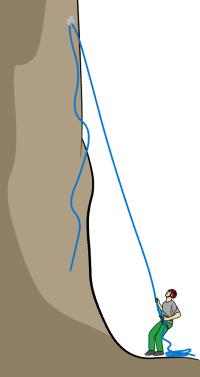
- Look out for ledges, trees, chimneys or anything you might abseil into on your descent.
- If your rope is stuck, stop just above it and allow your prusik knot to tighten. Make sure to keep hold of the ropes with one hand while you untangle them.
- Be aware of where your rope is (above and below you). Make sure it isn't rubbing over loose rock or sharp edges.
- You can only abseil half of the total length of rope that you have, so keep this in mind before climbing up.
- Be aware of rocks which may get dislodged when you pull your ropes down.


2 thoughts on “Sport Climbing – How To Descend”
Comments are closed.