Check out the full self-rescue video course, or download the e-book.
Simul climbing is a technique where all climbers move at the same time while tied into the same rope. Protection is placed by the first climber and removed by the last.
This technique allows climbers to extend the length of their pitches, without extending the length of their rope. With experience, a simul-pitch can stretch for 300m or more, whereas a belayed pitch is limited by the length of your rope.
Advantages
- Much faster than belayed climbing.
Disadvantages
- Much more dangerous than belayed climbing. If the follower falls, they could pull the leader off too.
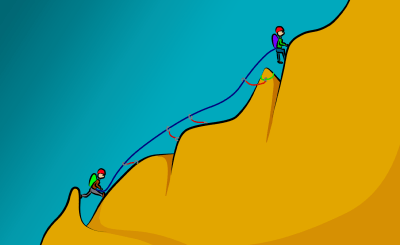

Simul Climbing is Most Useful:
- On long, easy routes when it is safer to move fast (e.g: climbing pitch-by-pitch would result in getting hit by a storm or stranded overnight).
- On a long, exposed approach or descent when a fall is very unlikely, but the consequences would be severe.
- If a pitch is slightly longer than your rope length. A short section of simul climbing can allow the leader to reach a more solid belay.
Simul Climbing is Dangerous:
- If any member of the team might find the route difficult (especially the follower)
- On loose rock
- On runout routes (climbs which offer little protection)
- For inexperienced climbers
Prerequisite Skills
Simul climbing introduces a level of risk that is completely inappropriate for beginner climbers. This section is written for experienced trad climbers who are proficient at:
- Placing trad gear and building anchors
- Route-finding on complex terrain
- Leading long multi-pitch routes
- Self rescue
- Analysing and managing risk
The Basic Simul Climbing System
Step 1
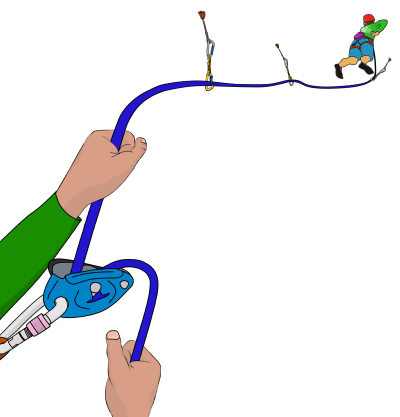
The leader begins climbing. They place gear and are belayed with a GriGri.
Step 2
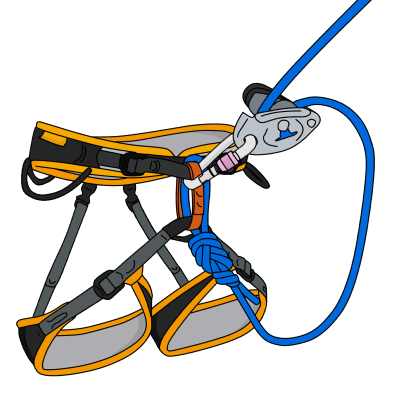
When the leader has climbed the full length of the available rope, the belayer simply begins climbing (leaving their GriGri attached to their belay loop).
Step 3
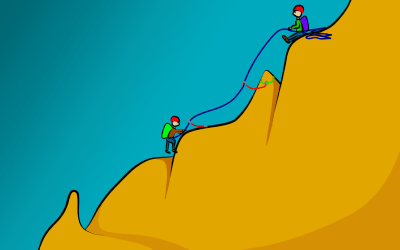
Both climbers continue up, moving at the exact same speed and keeping protection on the rope between them.

Step 4
When the leader reaches a suitable anchor, they stop climbing and belay the follower up.
Simul Climbing Equipment
What To Take
With both climbers constantly moving, it is easier to stay warm, and so belay jackets could be left behind. With a faster style of ascent, you could take less food and water.
The less you bring, the easier the climbing will feel, and the less chance you will have of getting exhausted or benighted on a long route. However, the decision to leave critical items behind should only be made with lots of experience.
Depending on how long you plan to stretch your simul-pitches, you may want to bring a bigger rack. Having more gear enables you to climb the route in less pitches and therefore spend less time changing over belays.
Gear Distribution
It’s better to distribute the gear fairly evenly between the leader and the follower so that neither climber has an excessively heavy load. Often, the leader will take a little more weight so the follower will be able to stay as light and nimble as possible. Remember that the leader will start the simul-pitch with the whole rack, but the follower will have it all by the end.
Simul Climbing Devices
In addition to the equipment you would normally take on a multi-pitch, these two devices give you more options for simul climbing:
- Progress capture devices (such as the RollNLock or Tibloc)
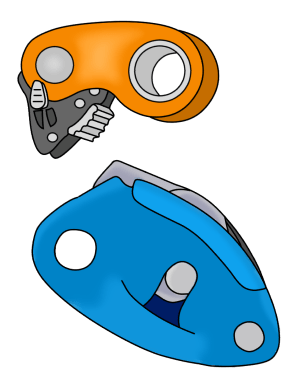
- An assisted braking belay device (such as a GriGri)
The Simul Climbing Setup
For most situations, the optimum distance between climbers while simul climbing is around 30m. This is close enough that you can communicate well with each other and manage rope drag, while being long enough to ensure adequate protection between climbers.
Simply using a 30m rope has drawbacks, especially if your route has an involved descent. Shortening a full length rope with coils will give you more options on the route. There are several ways of doing this. A simple setup is described below.
Follower:
- Tied in to the end of the rope with a figure-8.
- 20-30m of rope is neatly coiled over the shoulder, then pulled tight to belay loop with an alpine butterfly.
- GriGri pre-attached to belay loop with a small amount of slack in the rope.
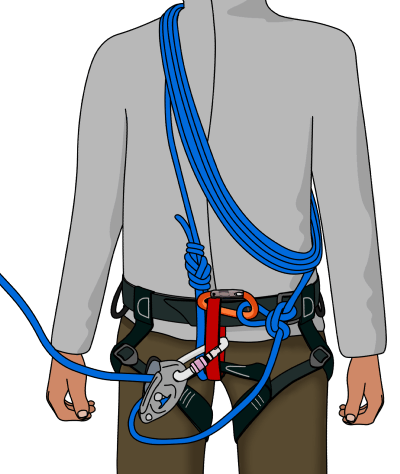
Leader:
- Tied in to the end of the rope with a figure-8.
- GriGri pre-attached to belay loop (this allows a quick transition to belaying when needed).

Optional Rope Coils
The leader could also attach to the rope with coils in the same way as the follower. Each climber takes half the number of coils so the length of rope between them is still the same. This enables the leader to quickly release some extra rope without needing to communicate this to the follower.
Make sure to keep your rope coils tight so they are unlikely to snag on rock features as you climb. Whenever releasing coils, always keep a hand on the brake strand of rope until you either re-tie your coils or reach the end of the rope – GriGri’s are not designed to be hands-free.
Simul Climbing – Understanding Dangers
Falling
The main danger with simul climbing is falling. This isn’t a big deal if the leader falls (assuming they protected the climb well and the follower hasn’t allowed slack into the system). However, if the follower falls, they will probably pull the leader off too. The leader will then be sucked, crotch first, into their last piece of gear.
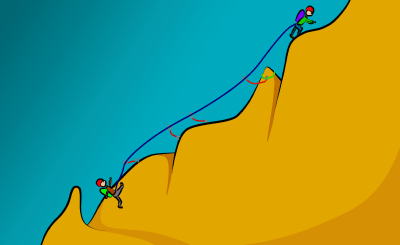
The force on that piece of gear is far greater than in a normal climbing situation. This is because:
- There is twice as much weight falling on the piece.
- The second cannot give a dynamic belay because they are falling.
The force generated is much more likely to explode that gear from the rock. For this reason, it is not safe to simul climb on routes that are loose, runout, or that either member of the team may find difficult. Using progress-capture devices reduces the chance of this type of fall.
Awareness
It’s easy to get swept up in the flow of a long simul-lead, and take unnecessary risks.
As a simul-leader, you should:
- Communicate clearly with your partner about your plan.
- Ensure that you protect the climb well when needed.
- Save enough gear to make a solid anchor.
- Be prepared to switch to belayed climbing anytime, even if this involves downclimbing.
- Be aware of your partners position on the route. If there is a tricky section, you should place gear on the rope in front of you just before they climb it, so that you are both protected. Or better, make an anchor and belay them up.
Unroping
On long ridges, there are often stretches of non-exposed hiking between steeper rock sections. A rope which is dragged through hiking terrain is likely to get stuck or dislodge rocks. It may be safer to put the rope away and stay close together, therefore avoiding any self-inflicted rockfall danger, and being able communicate more easily about route-finding.
Make sure you have a solid belay when transitioning back to belaying or simul climbing. Being unroped on exposed and/or difficult terrain is obviously very dangerous.
Climbing at Different Speeds – The Accordion Effect
It is important for both climbers to move at the same pace so there is no unnecessary slack in the system. Having too much slack can result in either an unnecessarily long fall for the leader, or a high loading of the progress-capture device if the follower falls. The follower also risks pulling the leader off the wall if they are not keeping up the pace, or if they have to down-climb.
Keeping the exact same pace all the time is extremely difficult. However, using rope coils makes this much easier.
For example, the leader may stop to place gear, while the follower is in a strenuous or awkward position. Instead of staying there, the follower can move up to a comfortable position while pulling the excess slack through their GriGri. From a resting position, the follower can then belay the slack rope back while the leader climbs up.
Also, if the follower would prefer a real belay for a difficult section, but the leader needs more rope to reach a solid anchor, the follower can release some coils and belay the leader until they find an anchor.
Once the leader has made a suitable anchor, the follower can either tie-off the coils again or continue belaying out the rest of their coils while the leader belays the rope in. This ensures there is never any unnecessary slack in the system. Once all the slack has been taken in, the leader can continue to belay the follower up to the anchor.
Similarly, if the leader encounters more difficult ground, the follower can stop at a good stance and/or make an anchor. The follower can then release their coils and belay the leader. Being able to quickly transition between simuling and belayed climbing allows you to safely navigate crux sections while cruising across the easier terrain.
Using Progress-Capture Devices
The use of a progress-capture device (such as the RollNLock or Tibloc) can protect the leader from receiving too hard of a pull on their rope if the follower falls.
The leader simply attaches a PCD to a piece of gear as shown. In theory, if the follower falls, the device will lock on the rope and hold the fall without affecting the leader.
In reality, there are serious drawbacks, which could make the situation more dangerous if the system is not fully understood.
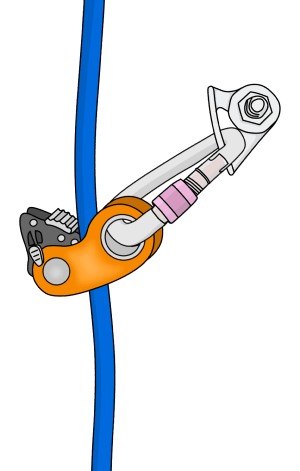
PCD’s should be attached to bomber multi-directional gear with minimum extension. Clipping one directly to a bolt is the best option, but they can also work well with trad gear if some cunning sling craft is used. Make sure your rope is able to run freely through the device.
The more the device can move up or down, the more the leader will ‘feel’ a tug if the follower falls and therefore have a greater chance of being pulled off. This will also exert a greater force on the rope, increasing the chance of ruining the sheath. Do not extend a PCD.
The leader should place another progress-capture device before the follower removes the previous one, so there is always one in the system.
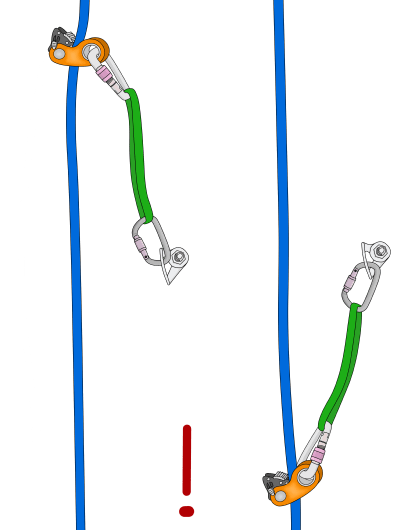
Dangers of Progress-Capture Devices
* A high force (such as the follower falling when there is slack in the system, or falling on a ridge traverse) could sever the rope’s sheath.
* On wandering climbs, the PCD may get pulled to one side, causing it to (depending on the type of device) disengage or add rope drag.
* Many types of PCD work poorly on wet or icy ropes.
* If the leader needs to downclimb, the follower cannot take in any of the slack created. In this case, the leader must belay themselves down with their GriGri.
* If the follower needs to downclimb, they will have to remove their coils and self-belay down.
Types of Progress-Capture Device
There are many PCD’s available, but some are more suitable than others for simul climbing.
A device with a ribbed camming style is less harsh on rope sheaths than a toothed device. A PCD with a ball bearing pulley will feed rope through smoother than one without.
A good device is the Climbing Technology RollNLock which features a ribbed cam and a ball bearing pulley.

Another commonly used device with a ball bearing pulley is the Petzl Micro Traxion. However, this is a toothed device and so is more likely to damage a rope’s sheath.
Other ribbed devices include the Kong Duck and the Wild Country Ropeman. These do not have a pulley, so do not feed as smoothly as the RollNLock. A much simpler device is the Petzl Tibloc which is cheaper and lighter than the others but is toothed and has no pulley.
Simul Climbing – Summary
Simul climbing does not need to be epic. For example, if after climbing a full rope length, the leader is still 3 meters away from a belay, the follower may be able to safely provide them with enough rope by removing their belay and walking 3 meters across a ledge. This may be much safer than the leader attempting a desperate downclimb.
The techniques discussed in this section are for advanced, experienced climbers who are looking for creative ways to solve problems and climb faster. Make sure you fully understand the dangers and only apply simul climbing techniques to situations when it is safe to do so.


4 thoughts on “Safe Simul Climbing”
Comments are closed.