Check out the full big wall video course, or download the e-book.
Step 1 – On Belay
Before you leave the belay (or ground), you’ll need to get set up for the lead. Both climbers tie into the rope and the leader is put on belay, just the same as for any other climb.
The figure-8 is widely recognised as being the safest knot to tie in with. An assisted-braking belay device (e.g: a GriGri) is highly recommended for belaying.
Step 2 – Attach Daisies and Aiders to Harness
Girth hitch one end of each daisy through your harness tie-in points, or your belay loop. Going through your tie-in points means you can get closer to each aid placement, but it cinches your waist belt and leg loops together.
Going through the belay loop puts you further away but can be more comfortable. Try it both ways to see which suits you.
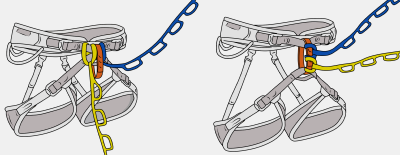
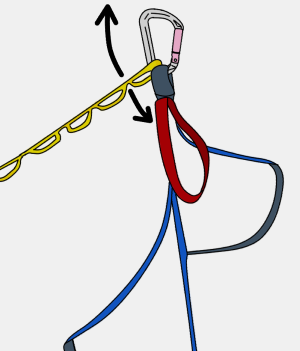
Clip the other end of your daisies to your aiders with a carabiner.
Put your aiders on the 'gate' side of the carabiner, so the daisy is free to move up the back bar when top-stepping. If your daisy is on the gate side, it could get stuck in the gate or unclip (not good!) when you top-step.
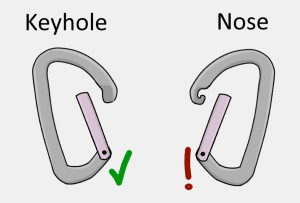
It's better to use a 'keyhole' style snapgate carabiner for your aiders/daisies, as it will be less likely to get stuck on slings and nut wires than a 'nose' style carabiner.
Step 3 – Rack Up
Fill your gear loops with enough rack to get going. You don’t need the whole rack – some things can be passed up later.
Step 4 – Attach Haul Rope
Clip the haul rope to the haul loop on the back of your harness. If you don't have a haul loop, you can make one by tying a short piece of webbing around the back of your waist belt.
Don't clip the haul rope to a gear loop – they're not strong enough.
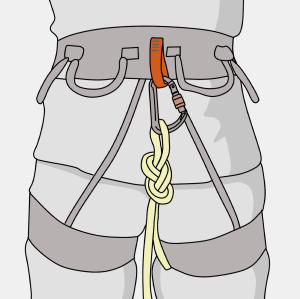
Another method is to trail the haul rope with the hauling device pre-attached as shown.
After leading a pitch, the device can be attached to the anchor before removing the rope from your harness. This means that you can’t drop either the device or the rope while setting up the haul.
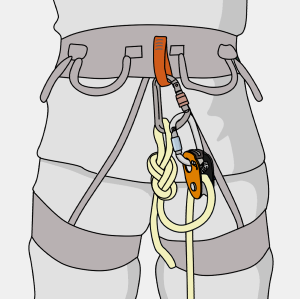
Step 5 – Prepare For Blast Off
Clip the lead rope to a high point of the anchor (just like you would on a trad multi-pitch) so you won't take a factor two fall onto your belayer if you fall on the first move.
After a final safety check, remove your attachment point to the anchor itself and you are ready to go.
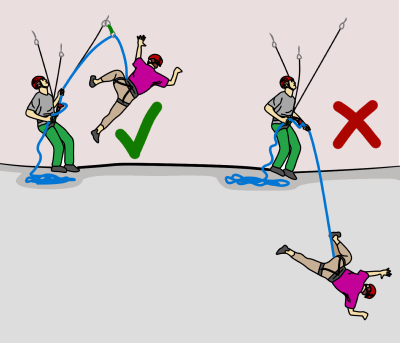
The Basic Aid Climbing Lead System
The basic system of leading an aid pitch is:
1) Place a piece of gear
2) Test the gear
3) Transfer your weight on to it
4) Clip the rope into your previous piece of gear
5) Get as high as you can
6) Repeat
These steps are described in more detail below.
Step 1 - Place Gear
Place a piece of gear and attach yourself to it with your free aider (the one you're not standing in).
Clip as high on the piece as possible (e.g; in the plastic thumb-loop of a cam, rather than the sling). This gives you more height, meaning less moves to the top.
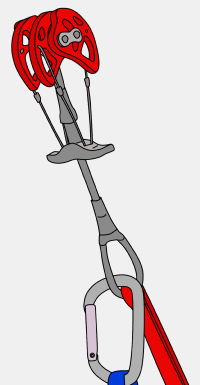
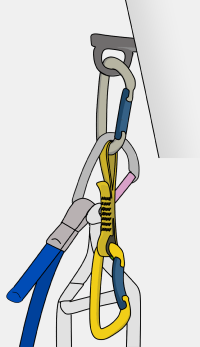
When clipping gear which only has a big enough hole for one carabiner (such as a rivet hanger or a piton), you can clip a quickdraw to it first and then clip your aider onto that.
This way you will be able to clip it as protection before removing your aider, therefore never being detached from the piece. It will, however, mean that you're a carabiner-length lower, so it may be harder to reach the next piece.
Step 2 - Test Gear
How you test gear depends on what it is and what the consequences of it failing are. A visual test may be all that is needed – if it looks bomber, just get straight on it. If you’re not sure, give it a ‘bounce test'. The point of bounce testing is to generate a little more force than your bodyweight alone. This determines whether or not the piece will continue to hold your weight while you are gently moving up your aiders and making the following move. It does not determine if the piece can withstand the higher force of a leader fall.
How you test depends on what the gear is. Burly gear (such as nuts, slings and pitons) can be bounced aggressively whereas more easily damaged or low-strength gear, (such as cams or micro nuts) should only be very gently bounced.
If you choose to test the piece, you should adjust your daisies so that you won't shock load your previous piece if it fails. Your position here is important. If the pieces fails, your goal is to transfer your weight as gently as possible onto your lower piece.
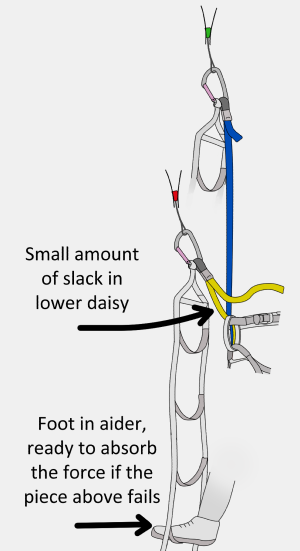
Adjust your daisies correctly, hold onto your lower daisy and leave one foot in your lower aider so you are ready to absorb the force if your top piece fails.
First, ease your weight onto the piece until it holds the majority of your body weight. Then bounce your weight on it by stamping in your top etrier with a slightly increased force each time (you could also bounce by sitting your weight onto your top daisy, but this is generally not as good). Essentially, you are shock-loading the gear. If it fails, you'll swing gently onto the lower piece, which should be strong enough to hold because you bounce tested it – right? Try not to look directly at the piece you are testing – if it fails, it'll hit you in the face!
Cam hooks or skyhooks shouldn't be bounce tested, as they would be damaged over time. To test these, weight the piece, press your body away from the wall and move side-to-side. This generates a little more force than bodyweight without the harsh impact of a bounce and simulates the direction you might pull the piece when you're higher up on it.
Bounce testing is the secret to hard aid climbing. With proper technique (which takes many climbs to develop), you will be able to move up whole pitches of marginal gear relatively securely. This still doesn’t mean that anything would hold a fall, but it does mean you are much less likely to fall.
Step 3 - Commit
Once you're happy that your upper piece will at least hold your weight, it's time to commit. Shift all your weight on to the top piece.
Step 4 - Reset
Reach down and clip your lead rope into your lower piece before removing your aider from it. If you're using adjustable daisies, fully extend it out at this point, then clip it to a gear loop, ready for the next placement.
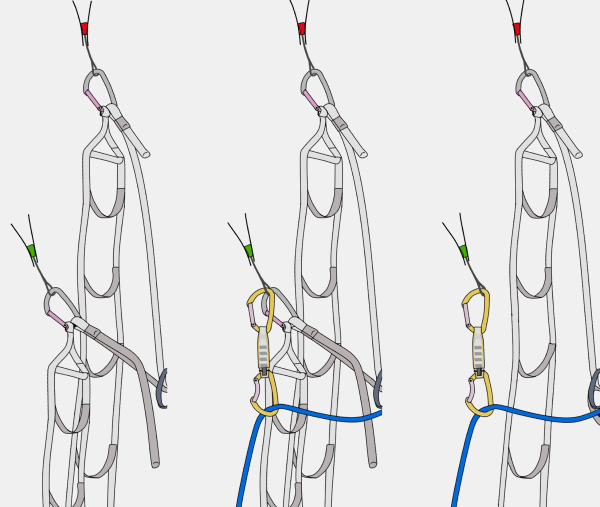
Step 5 - Get High
Getting as high on your top piece as you can means less moves to the top.
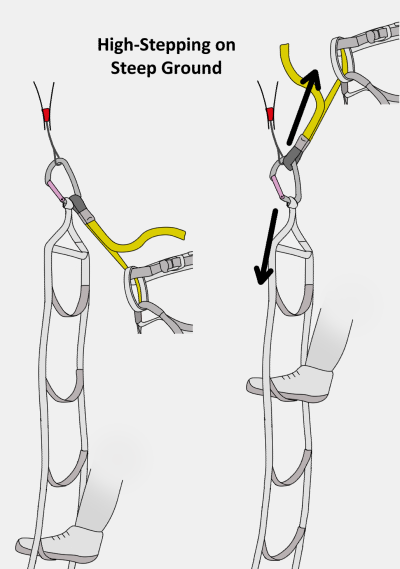
On slabby terrain, use the steps of your aider to walk upwards. With practise you should be able to stand in the top step easily. Hold onto rock features for balance if possible. As you move up, your daisy will slide up the back bar of its carabiner. Adjust your daisy tight to give you some downwards tension for balance. This also means that if you lose balance you won't fall the full length of the daisy.
Vertical or overhanging terrain is more strenuous. Move up your aiders and cinch your daisy tight to create downwards tension. By pushing down with your legs and pulling upwards with your daisy, you will create a strange feeling of opposition which provides balance.
Once you are as high up as you can get, it's time to find another placement and repeat step one.
How To Aid Climb - Leading Overhangs and Traverses
The system for leading a roof or a traverse is very similar to the standard method. Just place a piece, reach as far sideways as you can, and place your next piece. It may be difficult to bounce test from this position – try stamping in your aider instead of weighting your daisy. Remember that the follower will have to clip from piece to piece to clean the pitch, so try not to back-clean (remove) them.
How To Aid Climb - Leading Pendulums and Tension Traverses
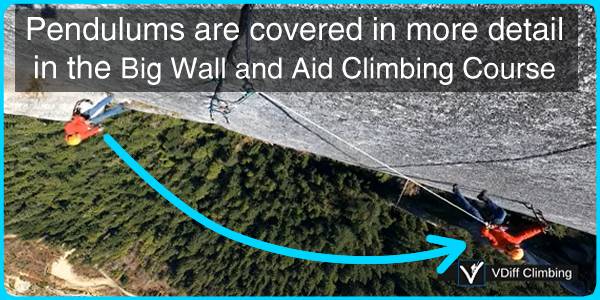
A pendulum is a great technique for moving sideways across a blank section. Essentially, you rope-swing across the blank section to features where you can begin climbing again. An alternative to swinging is to semi free climb across with some of your weight on the rope. This is known as a tension traverse.
Step 1 – Clip Gear
Place a piece of gear which can hold a downwards and a sideways pull (you may want to equalize a couple together). This gear should be bomber, and you probably won’t be able to retrieve it later. This is normally a bolt or rivet on popular routes. Clip your rope into the gear and ask your belayer to take you tight on the rope.
Step 2 – Lower
Get your belayer to lower you. If you plan to pendulum, you can start swinging as you are being lowered. Do this by running sideways across the wall. Communicate with your belayer so you don't get lowered too far – make sure you know where you're trying to swing to!
Step 3 – Swing
Keep your momentum and swing a little higher each time. Often, you'll need to grab a hold, hook an edge or clip a fixed piece at the pinnacle of your swing, so be ready for this.
Step 4 – Continue Up
Once you've stuck the pendulum, continue climbing as normal, making sure to extend the next few pieces of gear after this to reduce rope drag. Depending on the size of pendulum, difficulty of climbing and consequences of a fall, it may be better to back-clean gear until level with the pendulum point to further reduce rope drag.
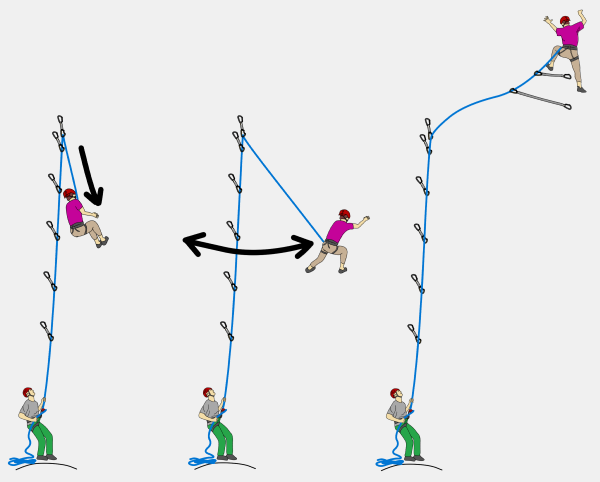
Pendulums with Two Lead Ropes
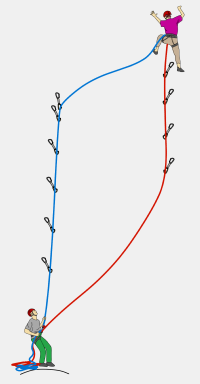
For big pendulums in the middle of a pitch, it is wise to use two lead ropes. Use one rope for clipping gear up to the pendulum point, and the other rope for gear after the pendulum.
It is recommended that the belayer uses two GriGri’s for belaying.
Switching Between Aid and Free Climbing
Sometimes it is necessary to switch from aid to free climbing in the middle of a pitch. To make this transition easier:
- Clip your aiders, daisies and other long tanglies away on the back of your harness so you won't trip over them in the middle of a free move.
- Attach a sling to your top piece. This will be your final foot step before you free climb.
- Ask your belayer to pass up your free climbing shoes if needed. You could also pass down your wall shoes and any other unnecessary heavy gear to your belayer.
French-Free
On some pitches it may be easier to french-free. This means mostly free climbing while holding onto the occasional piece of gear to avoid difficult moves and therefore speed the climb up.
You can clip gear directly into your belay loop, or attach slings to some pieces to use as foot loops. Get your belayer to take you tight whenever you need a rest. There are no rules really – just do whatever you can to cheat your way up quickly. French-free avoids the clunkiness of a full aid setup and is great on pitches that you can mostly free.
Routing the Rope
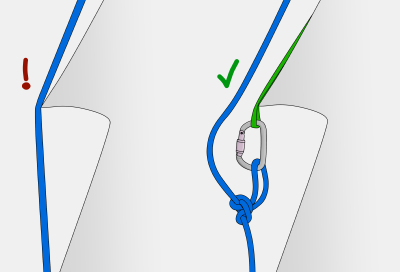
As with trad climbing, you should route your rope away from sharp edges, flakes and loose rock. Make skillful use of quickdraws and long slings to allow the rope to avoid these hazards and run in a straight line.
Remember that the rope will be taut when your partner is cleaning the pitch, which means it will cut faster on sharp edges.
Sometimes you may need to add a re-belay for pitches that end above a roof or on a ledge. Attach a sling down from the anchor so the rock abrades the sling, not the rope. Add a rope protector or duck-tape the edge too, if needed.
Back Cleaning
Sometimes, you'll need to use a piece of gear which you've already placed. Obviously, it's better to leave it there as protection, but this won't always be possible. If you remove your previous piece be aware that this can mean a big fall if your current piece fails.
A safer way is to place two or three good pieces in a row, then lower down to retrieve earlier pieces of gear. Make sure your top ones are bomber before committing to this. Once you've retrieved some gear, you can either aid back up the pieces to your high point (on top rope) or ascend the rope.
If ascending the rope, it is easier to attach your jumars to the rope which is running through the gear (rather than the rope coming straight from your harness). Retrieving gear from a traverse or overhang is more difficult. You will need to clip across your gear in reverse (known as back-aiding) to get to it, and then re-aid back up to your high point.
Passing Gear to the Leader
You don't need to take your entire aid rack on every pitch. If you need something from the belay, your belayer can clip it to a loop in the haul/tag rope and then you simply pull it up.
A common method is to only take enough gear to lead the first half of a pitch, then get resupplied when your rack is running low. This keeps some weight off your harness and is also useful for passing water, jackets or food on those long leads. Remember to pass the rope back once you’ve finished (if you just drop the rope, it’ll probably get stuck on faraway flakes).
However, once you are over half of the rope length up a pitch (e.g; you are over 30 meters up the pitch with a 60 meter haul rope), the belayer will need to attach an extra rope to the end of the haul rope so they can get it back again.
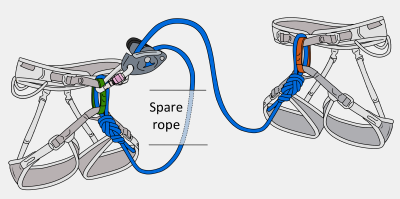
A quick solution which provides a short amount of extra rope is to clip the end of the haul rope to the loop of spare lead rope. If you regularly need to pass gear late in the pitch, a much better setup is to use a tag and haul rope.
Passing Gear to the Belayer
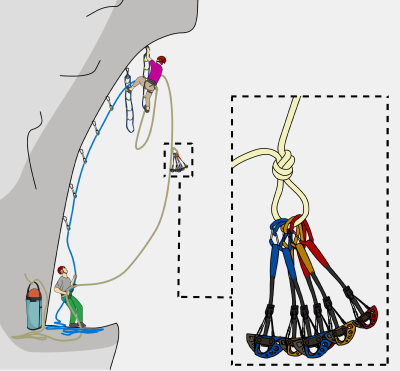
A quick way to pass gear from leader to belayer is to simply clip it to the haul rope and let it slide down.
The belayer will need to wiggle the rope to slow the item’s descent so it doesn’t slam into their face at full speed.
Regaining Your High Point After Falling
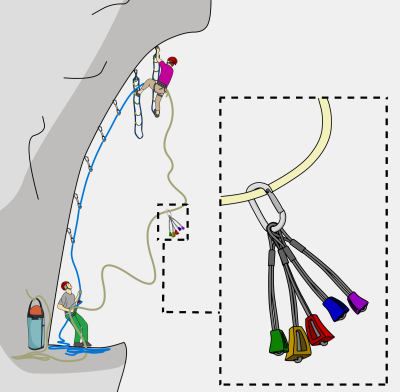
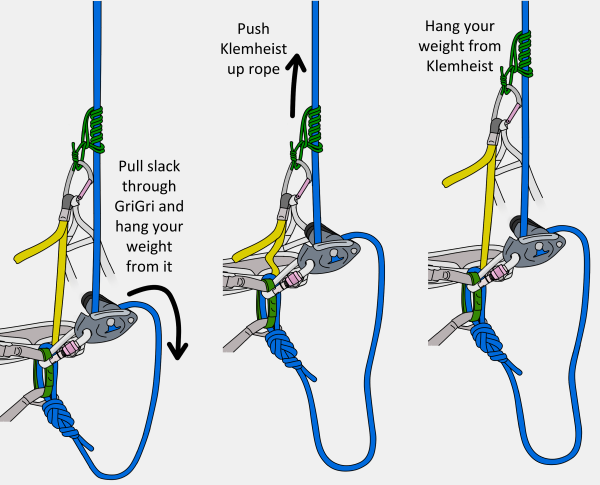
If you fall and are left dangling in space, you could jumar back up to your high point to continue the lead. But how secure is the piece that held you? If it blows while you are jumaring up, you’ll fall farther, but with the spiky toothed cams of your 5kN-rated jumars cutting into the rope – not good.
A better alternative is to ascend with a klemheist prusik and a GriGri as shown below. This way, if the piece above blows, you will fall on the GriGri and prusik instead.
Racking Gear
It’s better to rack gear the same as you would for trad climbing so you are already familiar with where things are, though it can be nice to spread things out on a chest harness too. It’s good to keep hooks, beaks and heads separate from nylon so they don’t stick to your slings.
Cheater Sticks
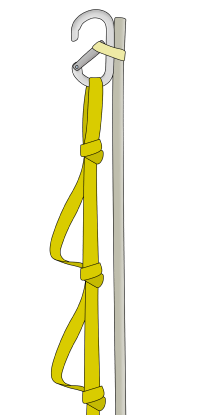
Cheater sticks allow you to bypass a difficult/impossible section by clipping a distant piece of fixed gear. Simply clip a carabiner to a long sling and tape it to some kind of stick/ avalanche probe/ portaledge fly pole as shown. Tie offset overhand knots in the sling so you can easily aid up it.
Cheater sticks are useful when abseiling down a steep wall but present problems when used on lead. First, having a cheater stick relatively handy makes it very tempting to clip past moves that you could do but are too scared to try. This prevents you from progressing at harder aid. It’s a bit like pulling on quickdraws when sport climbing, or standing on the bolt hangers. If you get into the habit of reaching for the cheat stick when things get scary, what will you do next time when there’s nothing to clip?
It’s also very difficult to test a far away piece of gear, which means you might end up falling anyway, even farther than you would have and with a giant stick in the equation.
