Check out the full big wall video course, or download the e-book.
Cleaning an aid pitch is different than cleaning a trad pitch. Instead of climbing the rock, you will use jumars to ascend the rope. There are two reasons for this:
1) It is much quicker and less strenuous to remove gear when ascending the rope than it is to clip your way up each piece of gear.
2) The leader is freed from the responsibilities of belaying. This enables them to do other things like haul the bags and organise the belay.
To follow an aid pitch, you will need:
- Two jumars
- A GriGri
- Your double set of daisies and aiders
Following an Aid Pitch – Leaving the Belay
Step 1
When the leader confirms that the lead rope is fixed, you can attach yourself to it.
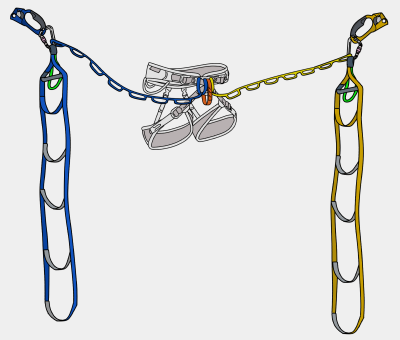
Attach your jumars to the carabiner with your aiders as shown.
Step 2
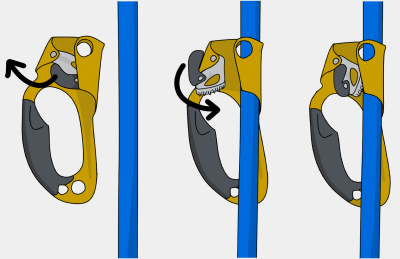
Pull the catch back on each of your jumars, slot them onto the rope and close the catch.
Step 3
Adjust your upper daisy to about half of its full length.
Step 4
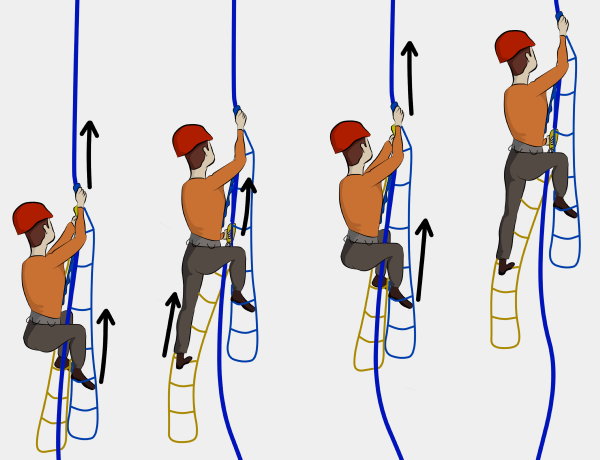
Place your feet on appropriate steps of your aiders, so that when your jumars are close together your feet are level with each other. Generally this will be one foot in your third step, the other in your fourth. Step into your lower aider to pull some of the stretch out of the rope. As you do this, push your upper jumar up the rope.
Then sit back, weighting your upper daisy, while pushing your lower jumar up the rope. Your hands do not need to leave their position on the jumars (using two hands to push one jumar is inefficient). Do this a few times until you've pulled all the stretch out of the rope, so you are no longer weighting the belay. This sequence is the basic technique, known as jumaring, that you will use to ascend the rope.
Step 5
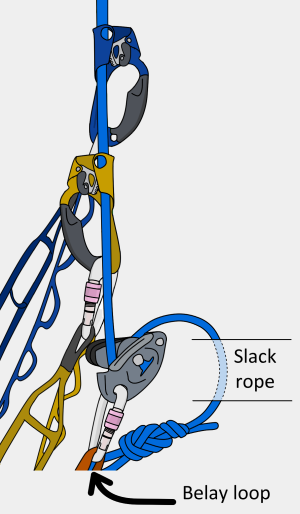
Jumars are not full-strength attachment points, so you also need to use a GriGri (or similar) to attach yourself to the rope. Take the slack rope from underneath your jumars and put it through your GriGri as shown. Attach this to your belay loop.
Step 6
While you are attaching yourself to the lead rope, the leader will be setting up the hauling system. When they tell you that the 'haul rope is ready', you can reply with ‘releasing haulbag'. Release the haul bag from the belay as described here.
Step 7
Detach yourself from the belay (but stay tied into the end of the lead rope) and begin cleaning the pitch.
Top Tip
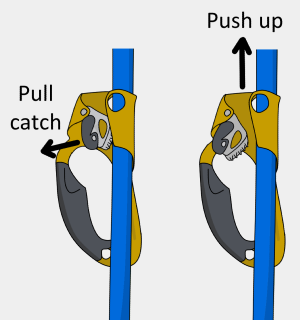
Your top jumar will slide up the rope easily because the rope is tensioned below it (by your lower jumar), but your lower jumar won’t act the same.
To move your lower jumar, you’ll need to pull the catch back slightly with your thumb. This moves the teeth away from the rope without disengaging the catch completely, meaning that it will glide up the rope. When you let go, the catch springs back and locks on the rope. This is a subtle movement which takes a bit of practise to develop.
Jumaring on Slightly Overhanging Terrain
Jumaring on steep ground is hard work, but gets easier with practise. The technique is basically the same as for vertical terrain, but you must synchronise your movements to be efficient. Weight your lower aider while simultaneously pushing your upper jumar up the rope (you'll need to unweight your foot on the upper one to do this). Then sit back on your upper daisy while pushing the lower jumar up, pulling the catch back slightly to help it slide up the rope. You may need to adjust your upper daisy to a shorter length if you are hanging too low.
You should alternate between resting your weight in your harness (when sitting back on your daisy) and having your weight on your legs (when standing up). You don’t need to pull yourself up with your arms. Make sure the rope feeds through your GriGri as you are jumaring up. Sometimes the weight of the rope will do this for you, but often you'll need to stop every few meters to pull it through. It's a good idea to clip the rope to your belay loop every 10 meters or so. This helps to keep the rope from getting stuck around distant flakes when it's windy, and also acts as an extra back-up.
Jumaring on Slabs
Jumaring on lower-angle terrain is easier. All your weight is on your legs – you don't need to weight your daisies. But if you need a rest, just sit back and hang on your top daisy. You'll need to adjust your daisies longer and put your feet one step lower in each aider than you would on steep ground.
Removing Gear when Jumaring
Cleaning Straight-Up Sections
On a perfectly straight-up pitch, you can simply unclip and remove gear.
Don’t slam your jumar right up into a knot or piece of gear as it needs to move up a few millimetres before it can be released.
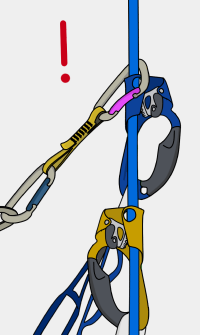
Cleaning Almost Straight-Up Sections
In many cases the gear will be pulled tight by the rope, making it hard to unclip. In this situation:
- Weight your lower jumar
- Remove your upper jumar from the rope
- Re-attach this jumar to the rope above the gear and weight it
- Now you can more easily remove or unclip the gear
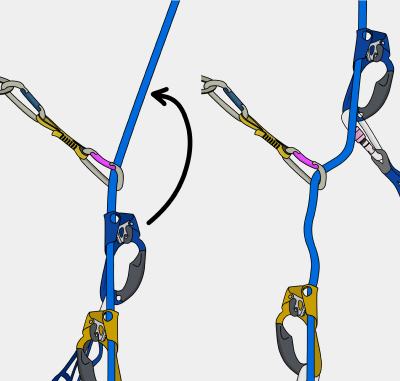
Diagonal Sections
If you use the previous method to remove gear on a diagonal pitch, your lower jumar will get ‘sucked in’ to the gear. To avoid this:
Step 1
Jumar close to the piece.
Step 2
Pull slack through your GriGri and weight it.
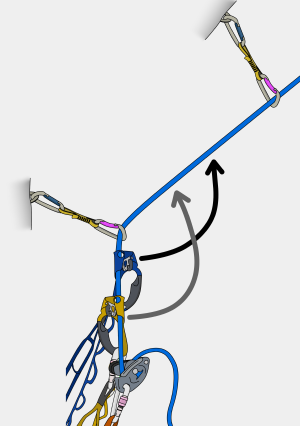
Step 3
Remove both jumars (one at a time) and reattach them above the piece.
Step 4
Release rope through your GriGri so that you are weighting the jumars again.
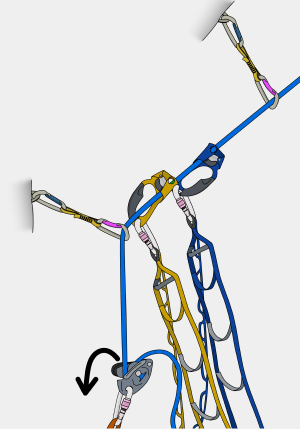
Step 5
Now you can remove the gear.
Traverses and Overhangs
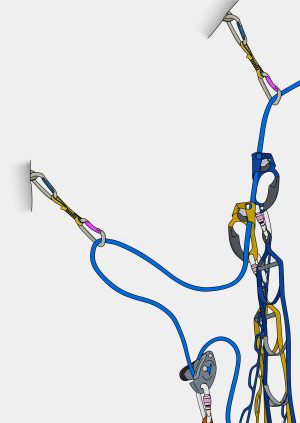
To clean a traverse or a steep overhang, you'll need to take both of your jumars off the rope and clip your aiders into the gear that the leader placed. Effectively, you are 'leading on top rope', belaying yourself with your GriGri.
Simply clip across the pieces, removing the ones behind you as you go. Make sure to keep pulling the slack rope through your GriGri and tie back up knots as you go. If the piece held the leader, then it'll (probably) hold you too. If it doesn't hold, then you'll fall safely onto your GriGri and/or back up knots. If the leader did some hook moves on the traverse, you’ll need to bring some hooks with you to repeat those moves when cleaning.
Cleaning Pendulums and Lowering Out
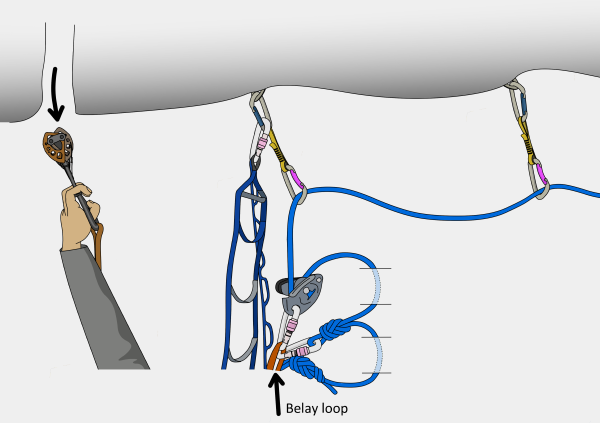
When you reach the piece which the leader pendulumed or tension traversed from, you can't remove it or else you'll swing uncontrollably across the wall. To avoid this, you'll need to do a lower-out.
You'll need plenty of slack rope for a lower-out (around three times the diagonal distance of the lower-out). This usually isn't a problem halfway up a pitch, but if there's a lower-out near the start of a pitch (or straight off the belay), make sure the leader fixes the rope with enough slack for you to do this.
The following method describes lowering out by passing a bight of rope through a fixed piece, therefore not needing to untie from the end of the rope. For very long lower outs, you may need to untie (described later in this article).
Step 1
Remove your jumars from the rope and clip one of your daisies directly into the lower-out piece. On well-travelled routes this will usually be a bolt or a collection of fixed gear. Your weight will be on this daisy while you're setting up the lower-out.
Step 2
Pull all the slack rope through your GriGri so the rope is tight to the upper belay.
Step 3
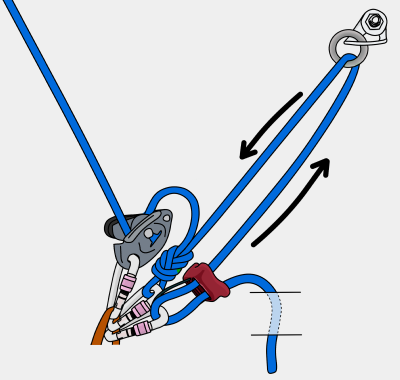
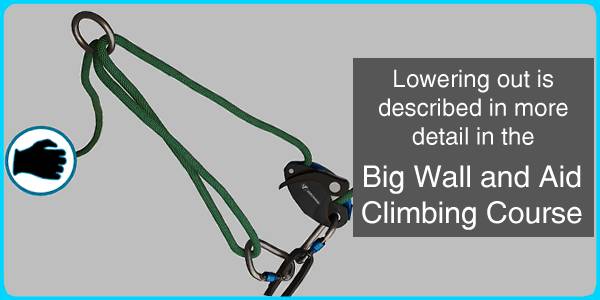
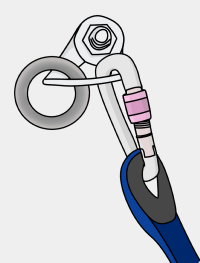
Take the slack rope from below your GriGri and push a bight of it through the ring or carabiner at the lower-out point.
Step 4
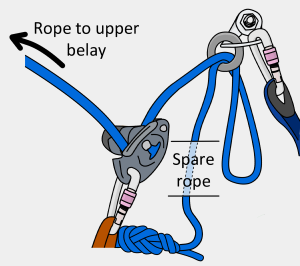
Attach the rope to another belay device (such as an ATC) on your belay loop as shown (if you don't have one, use a munter hitch).
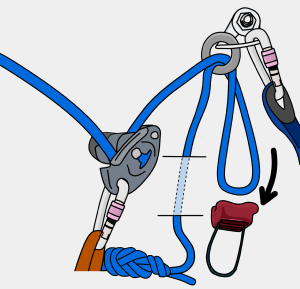
Step 5
Lean into the lower out point and take in all the slack rope through the ATC so that your weight is taken by it.
Step 6
Keeping hold of the brake rope, remove your daisy and any other gear from the lower-out point. Then lower yourself out by letting slack through your ATC.
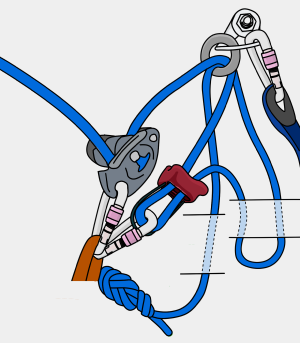
Step 7
When you have finished lowering, put your jumars back on the rope above you, remove your ATC and pull the bight of rope back through the lower out point. You can continue jumaring the now vertical rope.
Top Tip
If you don't quite have enough rope, you can jumar up a little after lowering as far as you can. This will give you extra rope to complete the lower-out.
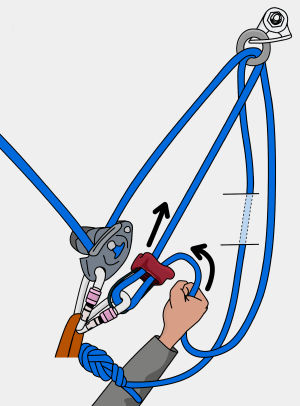
Longer Lower-Outs
The following technique uses half the amount of rope but involves untying from the end. This is useful for very long lower-outs or for lower-outs near the start of a pitch.
Step 1
Follow steps 1 and 2 as described in the previous section and add a back-up knot as shown.
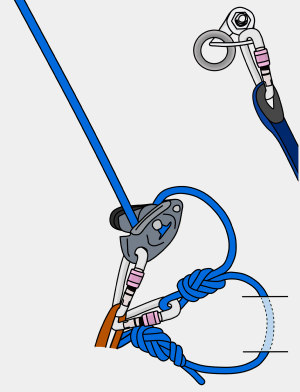
Step 2
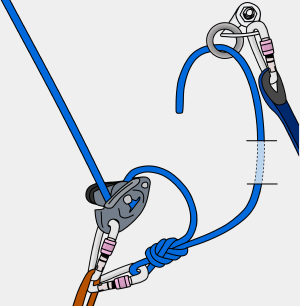
Untie from the end of the rope and feed it through the lower-out point.
Step 3
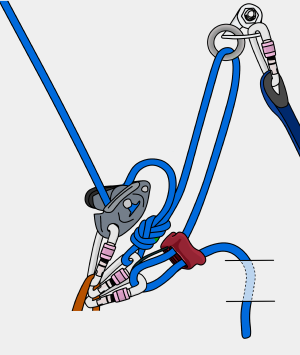
Attach the rope to an ATC (or munter hitch) on your belay loop and pull the slack through so your weight is taken by it.
Step 4
Remove your daisy and lower yourself out.
Step 5
When you’ve finished lowering out, remove your ATC, pull the rope through the lower-out point and tie back into the end.
