Climbing Technique > Footwork

'Climbing Technique: Footwork' is part of the book - Sport Climbing Basics.

VDiff learn to sport climb ebook

This section introduces the most common foot, hand and body positions used in rock climbing. How you grip handholds or stand on footholds depends on their shape, size and position. How you position your body depends on the location of these holds and the angle of the rock.

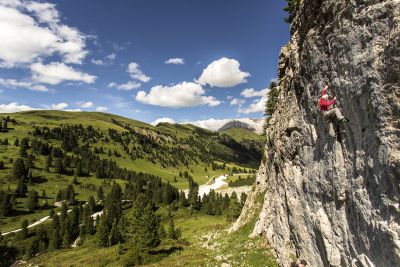
Practising in a climbing gym builds strength, endurance, flexibility and technique, but to climb well on real rock, you’ll need to actually climb on real rock.
improve sport climbing technique

Brightly coloured holds in a gym are obvious to find, but they are much more subtle on rock. Often a foothold is just a slightly lower angled dimple, or a series of tiny edges that require precise foot positioning.

Finding holds will get easier once you’ve learned to ‘read’ real rock. With practise, you’ll be able to use all kinds of weird rock features quickly and efficiently. Watching experienced climbers or hiring a climbing coach will help. But ultimately, improving your climbing movement requires plenty of real rock practise.

Climbing Technique: Footwork

Beginner climbers often concentrate on looking upwards for something to grab with their hands, forgetting about their footwork.

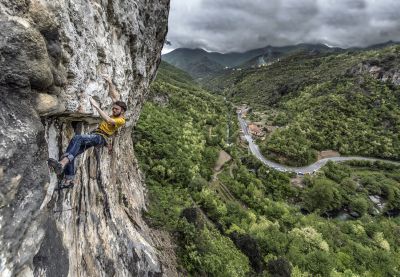
Having good footwork takes an enormous strain off your arms, making the climb much easier. There are basically three ways of using footholds; smearing, edging and hooking.
sport climbing footwork technique

Climbing Technique: Smearing

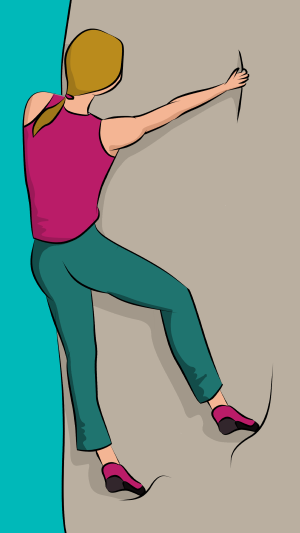
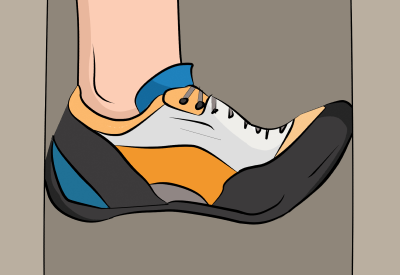
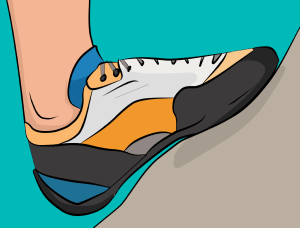
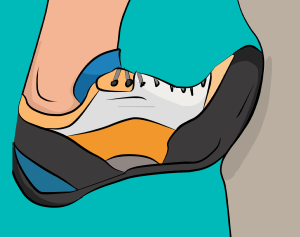
Smearing is a technique used to stand on poorly-defined, sloping features. The aim is to have as much surface contact between the sole of your shoe and the rock as possible, therefore maximising friction.

Focus on pushing your foot against the rock with your weight concentrated over your big toe.

Over time you will develop the ability to find tiny irregularities in the rock. Smearing on a dimple which is just a couple of degrees lower in angle can make a big difference.
rock climbing footwork technique smearing

Keep a high heel if smearing on small scoops. This keeps the pressure on the front of your foot.

Keep a low heel if smearing on a uniform slope. This gives more shoe-to-rock surface contact and therefore more friction. It also puts your calf muscles in a more relaxed position.
rock climbing smearing technique

Climbing Technique: Edging

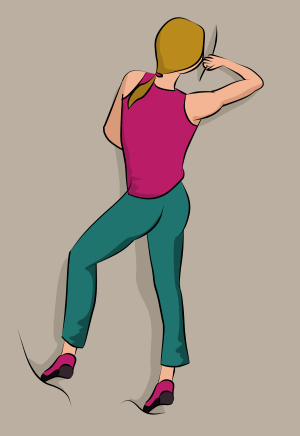
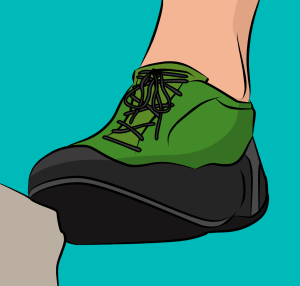
Edging means placing the very edge of your shoe on a pronounced edge of rock. Although any part of the shoe can be used to edge, you normally do so with the inside front part of the shoe, beneath the big toe.

With a good edge on vertical or overhanging terrain, you can pull in with your toe as well as push down. This moves your lower body closer to the wall and reduces the strain on your arms by keeping more weight on your feet.
rock climbing footwork technique edging

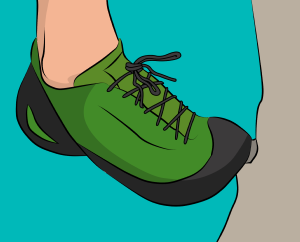
For tiny pockets and edges, you can edge on the front point of the shoe. This positions you neutrally so you can turn your body in either direction for the next move. It also gives you a little extra reach if you stand up on your tiptoe.
rock climbing edging technique

For techniques such as back-stepping, it is necessary to use the outside of the shoe (normally beneath the base of your little toe) to edge.
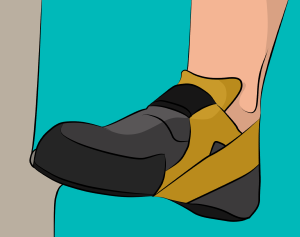
rock climbing footwork edging

VDiff sport climbing book

Climbing Technique: Heel and Toe Hooking

Heel hooking is the technique of using the foot as a ‘third hand’.

By hooking your heel over a flake or edge, you are able to pull with your leg. This allows you to move more fluidly and controlled through what would otherwise require a ‘dyno’.

On overhanging terrain, a crafty heel hook often helps to pull you into the rock, stops you from swinging out and provides extra reach.
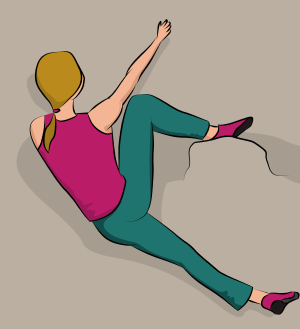
rock climbing heel hook technique

You can also employ a toe hook in a similar way to a heel hook.
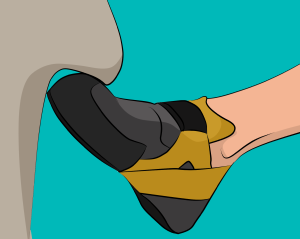
rock climbing footwork toe hook

A ‘foot cam’ can work in the same way too. Be aware that you may break your ankle if you fall with your foot in a really good heel-toe lock.
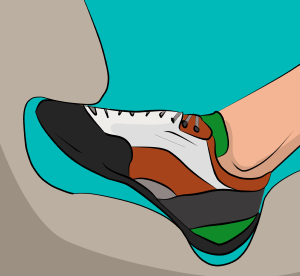
rock climbing footwork heel toe hook

Climbing Technique: Footwork Tips

* When you step from the ground to the rock, make sure to wipe the dirt and gravel from the soles of your shoes.

* With marginal smears or edges, it is important to keep your foot in the exact same position while your body moves up. Use your ankle as a hinge to absorb your movements. Any disruption to your foot position will probably cause you to slip off.

* To minimize strain on your upper body, use foot holds which are directly beneath your hands.

* When you’ve found the best hold, visualize how your foot will be positioned on it. Don’t move your foot until you know exactly where it’s going.

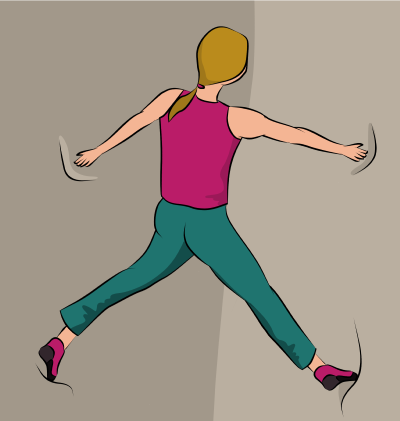
* Push your feet in opposite directions (stemming) to keep the weight off your arms.

* If you’re not sure whether to edge or smear, remember that you can smear an edge, but you can’t edge a smear.
Climbing Technique > Handholds

'Climbing Technique: Handholds' is part of the book - Sport Climbing Basics.

VDiff learn to sport climb book

The weight on your arms increases as the rock gets steeper and the footholds get smaller. Beginners often ‘over grip’ the rock and burn out their forearms too soon, making it impossible to then hold onto anything.

The challenge, therefore, is to use the lightest possible grip to make each move.

There are endless ways of using handholds, but four basic types are described below.

Climbing Handholds: The Crimp

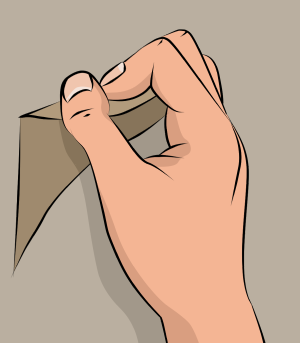
Crimping works best when the thumb is held over the index finger. This ‘closes’ the crimp and makes the position stronger. This is because your thumb is much stronger than your fingers in this position.

If the hold is too small to fit all your fingers, give priority to the middle finger (the strongest), followed by the ring finger, the index and finally the pinky.

Be careful when crimping sharp edges. If you slip off suddenly, you’ll probably slice your fingertips.

rock climbing crimping technique

Climbing Handholds: The Open Grip

The open grip is mainly used to hold onto large or rounded features. Search for the best position on the hold and then pull.

If the hold isn’t incut, you will rely on friction between your hands and the rock to hold on. For this reason, having more surface contact gives you more grip.

An open grip on sloping holds works in a similar way to your shoe when smearing.

In the long term, the open grip puts less strain on the joints and tendons than crimping.

rock climbing open grip technique

Climbing Handholds: The Pinch

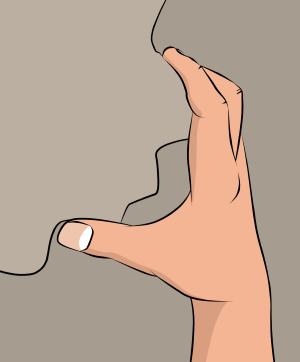
You pinch a hold in the same way as a crab pinches it’s claws. An effective use of the technique is to pinch a hold between your thumb and the side of your index finger.

rock climbing pinching grip technique

VDiff sport climbing book

Climbing Handholds: Pockets

To hold onto a pocket, you essentially use an open hand or crimp but with less fingers.

If you can fit two fingers in the pocket, it’s often better to use the middle and ring fingers, rather than a middle and index finger combo. This balances the load on your fingers much better.

If the pocket is only big enough for one finger, your middle finger will be strongest.

Be careful - the edges of pockets are often sharp. When you pull hard on a pocket, you are effectively grinding your finger tendons over that sharp edge. A common injury is to strain or break the delicate ligaments in the fingers due to excessive crimping and pocket pulling.

rock climbing finger pockets

Climbing Technique > Movement

These articles about climbing techniques are part of the book - Sport Climbing Basics.

VDiff learn to sport climb book

Climbing is like a dance. The aim is to choreograph different types of holds and moves into one fluid movement.

It is much more efficient and enjoyable to move up fluidly, methodically and in balance. Frantic, jerky movements are clumsy and will tire you out faster. Once this becomes second nature, you will soon begin to develop your own style and move on to more advanced climbing techniques.

learn sport climbing technique

After climbing each route, review the techniques that you used. Ask yourself what worked, what didn’t and what you could do to climb the route more efficiently.

Practise makes perfect!

Climbing Techniques: Sidepull

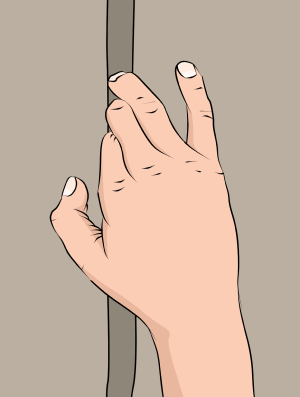
It’s impossible to pull straight down on a vertical crimp. Instead, these types of holds are used as sidepulls.

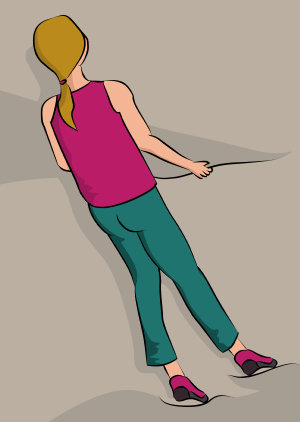
Lean from the sidepull and use your feet to oppose the force. This counter-pressure keeps you in balance while you use your legs for upward progress. Sidepulls often give you more reach than a horizontal hold.

You can sometimes turn a sidepull into a pinch if there is a catch for your thumb. This will create more inward pulling power if you need it.

rock climbing sidepull technique

Climbing Techniques: Gaston

A gaston is the opposite of a sidepull. Push outwards on the hold with your elbow pointing away from your body.

rock climbing gaston technique

Climbing Techniques: Palming and Stemming

Palming is similar to an open grip but you use your palm instead of your fingers. You can push yourself into a corner by palming on both sides of it.

To stem, smear your feet on either side of the corner. The opposing pressure of pushing inwards keeps you in balance.

rock climbing stemming technique

Climbing Techniques: Underclings

Underclinging relies on the counter-pressure between your hand pulling out from the hold and your feet pressing onto the rock.

This technique is often used to keep a climber in balance while searching for a better hold above.

On consecutive undercling moves, such as traversing under a flake, try to use footholds as much as possible and keep your arms straight. This takes the strain off your arms.

rock climbing undercling technique

Climbing Techniques: Mantling

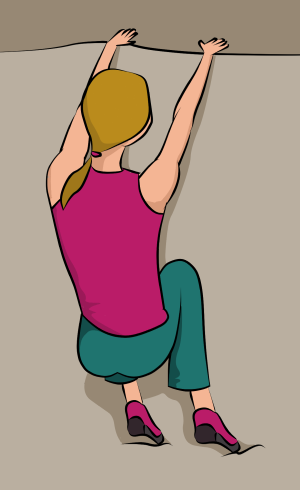
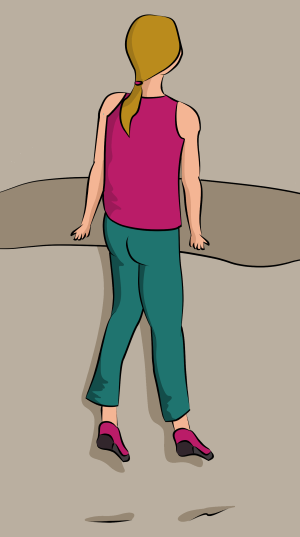
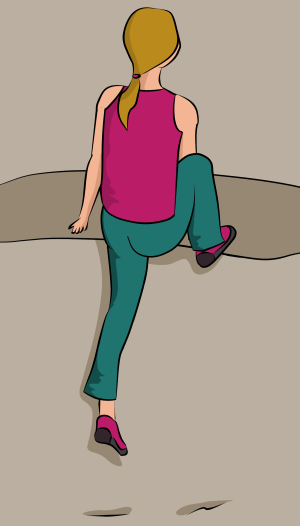
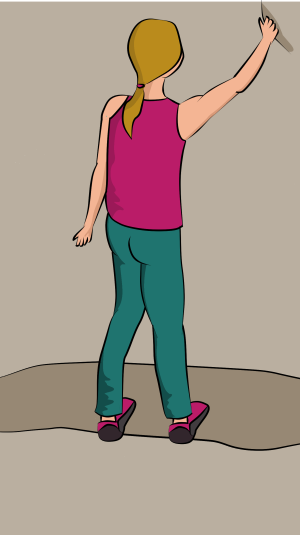
Mantling is the technique of surmounting a ledge when there are no holds above it to help with this (imagine getting out of a swimming pool without using the stairs). The following is a common mantling method, though many variations exist.

Step 1 - Step High
A high, well-placed foot is the foundation of the mantle. With your hands on the ledge, walk your feet up to the highest possible foothold. You may even be able to heel hook the ledge.

rock climbing mantling technique

Step 2 - Pull and Press
Pull up and switch your hands to a palm down press. Search above the ledge for any hand holds. Leaning forward and pulling yourself in with one hand makes the next step easier.

rock climbing mantle technique

Step 3 - Foot Up
If your foot isn’t already on the ledge, you can probably put it there now.

You may have to shuffle your hands to make space for your foot.

mantle rock climbing techniques

Step 4 - Rock Over
Shift the weight onto your high foot and stand up.

Try to avoid using the knee, as this will make it more difficult to stand up.

mantling rock climbing techniques

VDiff sport climbing book

Climbing Technique: Dynamic Moves

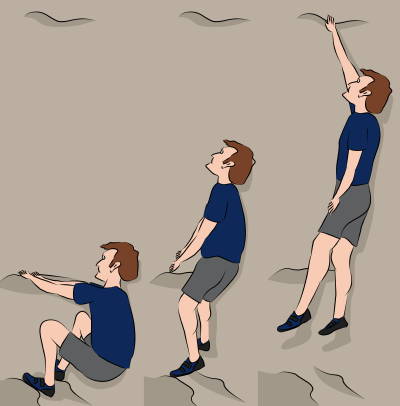
‘Dynos’ are probably the most spectacular climbing move. It is a way of using momentum to reach between distant hand holds.It is almost always more efficient to move statically between holds, but if a hold is too far away, a dyno may be the best way.

Get your feet up high and focus on the hold. Push up with your legs and pull with your arms. Move your hand quickly towards the hold. Grab onto the hold when your body reaches its apex.

A dyno is much easier if you can keep your feet on the footholds. This way, most of your weight is still on your feet when you grab the hold.

The disadvantage of dynoing is that you cannot be sure how good the hold is until you’ve committed. And committing is the most important part of the dyno. If you make a half-hearted attempt, you’ll be unlikely to stick the hold.

rock climbing dyno technique

Climbing Technique: Core Strength

Your core is the area between your lower chest and your mid-thighs. Engaging the core while climbing keeps you in control.

Without a tight core, you are likely to ‘sag’ beneath your arms, causing you to lean out from the rock, butt first.

Think of your core as something which dictates the movements of your arms, rather than something which you are simply dragging up the crag.

Climbing Technique: Slab Climbing

Climbing slabs (rock which is less than vertical) requires less strength and more balance than steeper angles of rock.

Your body should remain in the same upright position as when you’re walking. With gravity forcing the weight onto your shoes, you have more friction on the rock. Essentially, you will hold onto features for balance while pushing up with your legs.

easy sport climbing

Friction slabs are generally devoid of any positive features to crimp or edge on. To climb a friction slab, you must rely on the surface contact beneath your palms and feet. Small steps are generally more efficient. High steps tend to disrupt the delicate balance needed to stop you from sliding off.

On sustained slab climbs, where most of your weight is on your feet, it’s common to get ‘calf pump’ or ‘disco leg’. Make use of any good footholds by standing with your heel on the hold and your leg straight, so that your center of gravity is over your heel.

Climbing Technique: Vertical Rock

It is invariably more strenuous on the arms to climb a vertical rock than it is to climb a slab of the same grade.

It’s much more efficient to keep the weight off your arms as much as you can. This is done by pushing your hips and chest close to the wall and by using the minimum amount of energy to complete each move as possible. Remember that your feet provide the upwards thrust, while your hands primarily pull you into the rock.

learn sport climbing

Keep your hips perpendicular to the rock by standing on the inside edge of one foot and the outside edge of another. This is known as back-stepping. It allows you to use footholds on either side of your body with either foot.

Take advantage of any rests. Opposing your feet against each other across a corner (stemming) allows you to keep the weight off your arms. If you can’t get a two-hands rest, then alternately shake out your arms when you find a good handhold.

It’s often better to do a series of small moves, instead of a long one. Being stretched out tends to disrupt your balance and often makes the next move more strenuous.

Climbing Technique: Overhanging Routes

To climb efficiently on overhanging rock, you need to keep your hips close to the rock and your arms straight whenever possible. Bent arms will tire out much faster.

One way to do this is to use the dropknee. Place the outside edge of your shoe on a hold and twist your knee downward. Be careful though, dropknees put a lot of tension on the ligaments in your knee.

how to sport climb

As with other angles of rock, it is more efficient to pull yourself into the rock with your arms and push yourself up with your legs. This is much more physically demanding on steep routes, but even the poorest footholds will help ease the strain on your arms and give you something to push from.

Crack Climbing Technique

'Crack Climbing Technique' is part of the book - Trad Climbing Basics.

VDiff learn to trad climb e-book book

Cracks are often very striking lines. It’s no surprise that many classic routes follow crack systems.

Some climbs have short crack sections which offer the security of a solid jam and the sanctuary of good gear. On other routes, a crack may be the only climbable feature up an otherwise blank face.
Since most trad gear is designed to work in cracks, there is usually an abundance of bomber gear on crack climbs, making them great routes for learning the art of placing trad protection.

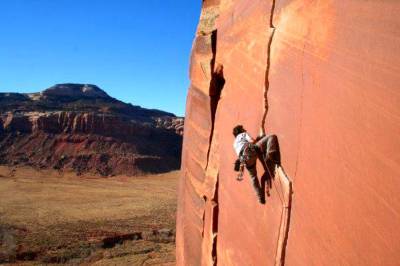
indian creek crack climbing

Jamming your hands and feet into cracks can be difficult (and painful) at first, but great fun once you learn the techniques.

This article covers crack climbing jams from fingertip width to full body chimneys, as well as recommended clothing.

Techniques are listed in size order, but the actual measurements of cracks are not given as this depends on how big your hands are. A climber with big hands may get a finger lock in the same place that a small-handed climber gets a perfect hand jam.

Crack Climbing: Dress for the Occasion

Clothing
For off-widths or chimneys, you’ll benefit from long sleeves and long canvas pants.

Don’t wear your best clothes though – they’ll get scraped up. Some climbers wear socks under their shoes and tuck their pant legs in to them.

How much you cover up depends on the coarseness of the rock, how long the crack is, and how good your technique is.

Shoes
Comfortable shoes which keep your toes straight are best for most crack climbing. Torquing your feet into a crack when wearing tight fitting bouldering shoes is very painful!

A high-cut shoe will save your ankle skin on wider cracks. If you have low-cut shoes, you’ll benefit from wearing socks or taping your ankles (or both) if you plan to climb anything wider than a fist crack.

For pure off-widths, you may be better with some sticky rubber approach shoes instead.

Gloves
Some climbing companies make rubber gloves for crack climbing. Made from the same sticky rubber as climbing shoes, they are designed to protect your hands from the harsh demands of crack climbing on coarse rock.

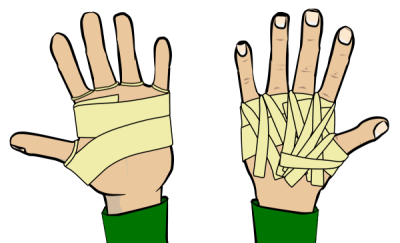
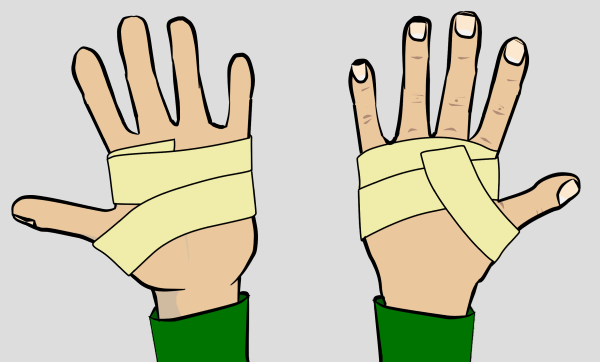
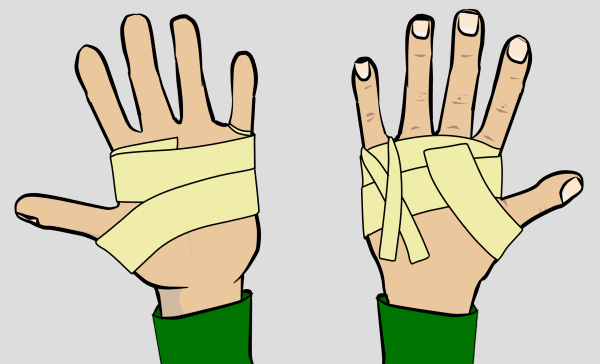
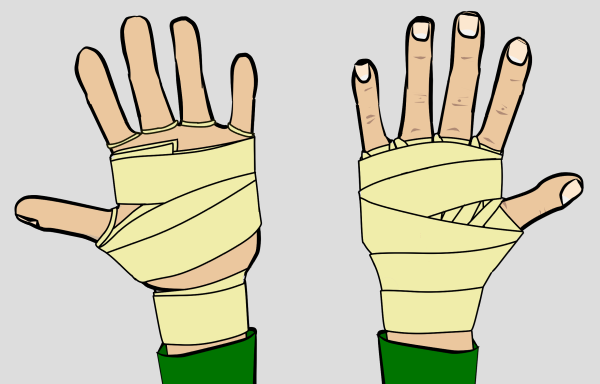
Rubber gloves are useful if you plan to do a lot of crack climbing. However, a cheaper alternative for the recreational crack climber is to make your own tape gloves using a roll of 1.5” wide athletic tape.

how to make tape gloves for crack climbing

Crack Climbing > Finger Cracks

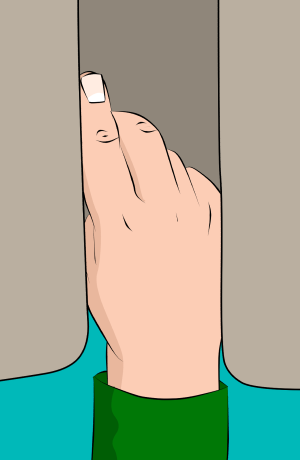
There are three techniques of climbing finger cracks:
- Finger locking
- Finger jamming
- Liebacking

When the crack is too wide for a finger jam but not wide enough for a hand jam, you’ll have to resort to more strenuous and often painful 'off-fingers' alternatives; thumb stacking and thumb camming.

Finger Locks

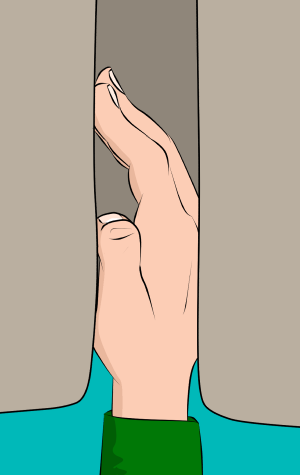
When there is a constriction in a crack which accepts your fingers up to the second or third knuckle, a finger lock can be very secure.

Just slot your fingers in and pull down. The further your fingers go in, the better the lock.

Try locking with your thumb either up or down for the best fit.

crack climbing finger locks

Finger Jams

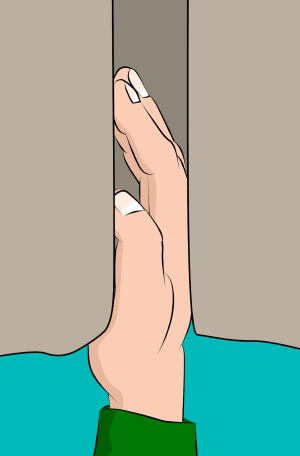
If there are no constrictions for finger locks, you can use the more strenuous finger jam instead.

With the thumb down, insert all your fingers into the crack and rotate your elbow down to torque your fingers into the crack. This creates opposing pressure which jams your fingers in place.

Liebacking

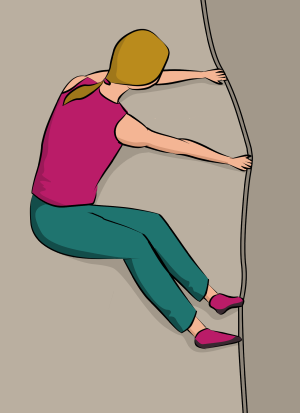
If you can’t jam or lock, liebacking might get you through a few moves. Treat the crack as one long sidepull and lean from it while opposing the pressure with your feet.

This works best on corner cracks, but also works well on offset cracks (where the rock protrudes further out on one side – like a mini corner).

If the crack is more incut on one side than the other, use the more incut side for a better handhold.

If there are footholds, you may be able to switch to stemming to get a good rest. Be careful though – it’s hard to place gear when liebacking as you cannot see inside the crack.

crack climbing lieback

Fingertips Cracks

These cracks accept only the tips of your fingers. Super thin cracks are often difficult to protect as well as climb.

Look out for constrictions that you may be able to slot a pinky finger in and smear or edge your feet off the crack.

Sometimes you will use the crack purely for protection and climb on face holds around it.


VDiff trad climbing book

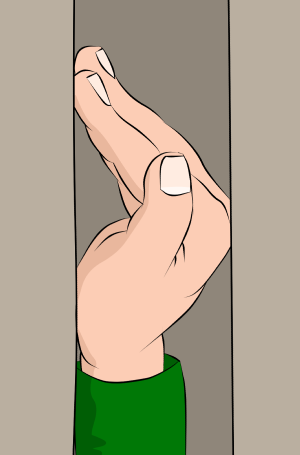
Thumb Stacks

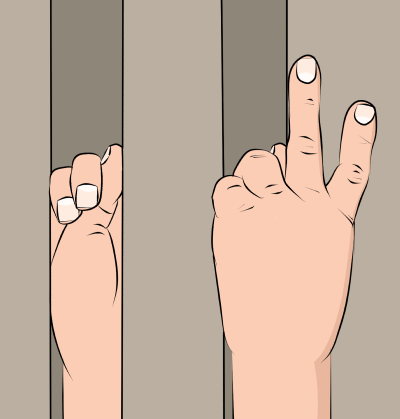
To thumb stack, put your thumb in the crack first, then wrap your index and middle fingers over the top. As you pull down and drop your elbow, the thumb stack torques into the crack.

To fine-tune the jam, vary the number of fingers you place over your thumb and the depth they go into the crack.

how to climb finger cracks

Thumb Cams

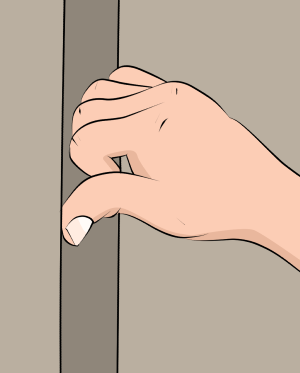
To thumb cam, put your fingers against one side of the crack with your thumb down and push your thumb against the other side.

This puts a lot of pressure on your thumb joints – be careful of dislocating it.

In corners, this only works with one hand, since the thumb is in the wrong position on the other hand.

thumb cam crack climbing

Finger Crack Footwork

Footwork is often difficult in finger and off-finger cracks because they can be too narrow to get your foot into. Often you will only be able to get the tip of your toe in.

Look out for wider spots or constrictions where you can get more purchase with your feet.

Finger Crack Sequence

The crux of many finger cracks is finding the most efficient sequence. This is mostly determined by the location of finger locks, face holds and footholds. You may need to shuffle your feet up before moving your hands, or maybe you’ll need to do a few finger locks before moving a foot up.

Constrictions make the best holds in finger cracks, but they also provide the best gear. If it is safe to do so, it can be better to use the finger lock first, then place gear in it at waist level.
It’ll make the climb much harder if you fill all the best finger locks with gear before using them.

Crack Climbing > Hand Cracks

At first, hand cracks are insecure and painful on the hands and feet. But with practise, a good hand jam is better than any jug and a foot jam is as good as standing on a ledge.

Put your hand in the crack, either thumb up or down, and fold your thumb across your palm. This expands your hand and jams it in place.

As with other types of jam, look for constrictions and slot your hand in just above to make the jam less strenuous and more secure.

hand jam crack climbing

Thin Hands

For thin hand cracks, push your hand in as far as it will go and press your fingers against the crack.

Your hand is jammed in position because of the opposing pressure between your finger tips and knuckles. It’s better if you can get a thumb in to help too.

how to crack climb

Wide Hands

For wide hand cracks, you can either cam or cup your hand.

To cam, twist a hand jam so your thumb goes further into the crack. This puts your hand in a position which is half a hand jam and half a fist jam.

hand crack climbing

For cupped hands, make a wide hand jam and hook your thumb over your index finger if you can.

The base of your palm and fingertips press against one side of the crack, while your knuckles push against the other.
You can twist this to combine the cupped and cammed hand jam for more holding power.
crack climbing hand jams

Hand Crack Footwork

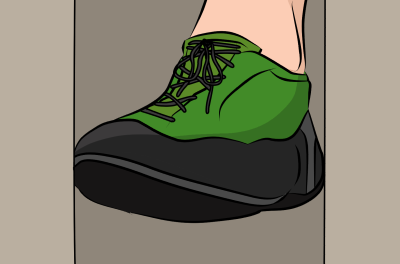
To jam your feet, slip your foot halfway into the crack with the big toe up. Then torque it in by pushing your big toe down.

Hand Crack Sequence

To move fast on a straight-in hand crack, jam with your thumbs up and ‘windmill’ your arms – reach through with each jam, right over left then left over right. Walk your feet up in the same pattern.

If the crack is awkward, diagonal or in a corner, it is usually better to have a leading hand and a following hand – so you never reach through. You will generally get more reach if the leading hand is thumbs down and the following hand is thumbs up. Set a high jam, bring your lower hand up just beneath it, then move your feet up and repeat.

On diagonal cracks, you will normally keep in balance better by having one foot in the crack while the other smears on the face.

Crack Climbing > Fist Cracks

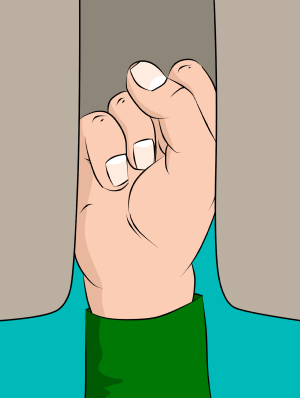
If you twist a hand jam further around it becomes a fist jam. Your thumb knuckles and outside edge of your index finger will press against one side of the crack while the outside edge of your pinky finger presses against the other side of the crack.

You can fist jam with your palms facing in or out, though facing out makes it easier to move up on straightforward fist cracks.

If the crack leans or is in a corner, try having your leading fist palm in and your lower fist palm out. As with hand jams, set a high jam, bring your lower hand up just beneath it, then move your feet up and repeat.

crack climbing

Fist Crack Footwork

Unless your feet are particularly narrow, fist cracks make great footholds. Torque them in just as you would for a hand crack.

Crack Climbing > Off-Width Cracks

Wide cracks are often regarded as more work than fun. Although they do require a lot of effort and grovelling, the challenge provides a satisfying reward. Learning the following skills takes dedication – be prepared to lose some skin in the process.

Off-Width Sequence

The general off-width sequence is:
- Get your feet wedged in the crack
- Push your upper body up and wedge it in
- Move your feet up
- Repeat

Which wedging technique you use for your feet and upper body depends on the size of the crack. Off-widths often change size so you’ll need to use a variety of techniques.

Off-Width Footwork

Foot Cam
Slide your upper foot into the crack and twist the ball of your foot against one side of the crack and your outside heel against the other.

You could then jam your lower foot on the outside of the crack by pressing the inside heel against one side and the outside front of your foot against the other.

off width crack climbing

Heel-Toe Jam
If the crack is too wide for a foot cam, you can use a heel-toe jam.

Position your foot horizontally with your toe smearing on one side and your heel jammed on the other.

how to offwidth crack climb

Knee Jam
This works well if the crack is slightly bigger than your knee, but be careful not to get your knee stuck.

Slide your knee high into the crack. Then pull your foot back and wrap your toes around the edge of the crack. You can do a foot cam below with your other foot.

As the crack gets slightly bigger, bury your whole thigh in the crack, then bend your knee to expand your leg in place.

Off-Width Upper Body Technique

Hand Stacks
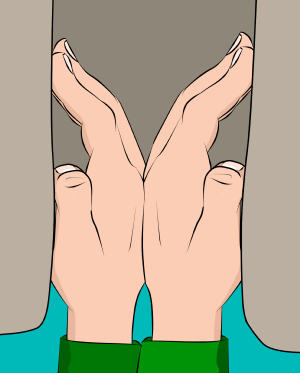
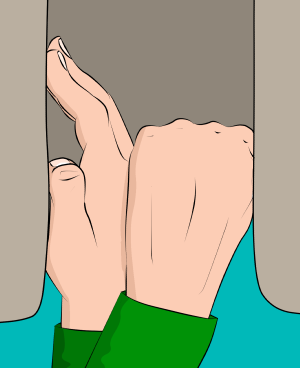
Set two jams side by side to fill the width of the crack. You can jam hand/hand, hand/fist, or fist/fist depending on the size of the off-width.

For a hand/hand jam (butterfly stack), place the backs of your hands together and jam them in the crack with your thumbs up.

off width crack climbing

Hand/fist and fist/fist jams are generally more secure with your arms crossed at the wrist (rather than normal left/right orientation).

crack climbing hand stacks

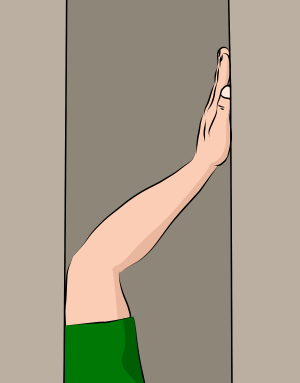
Arm-Bar
The arm-bar involves placing your inside hand deep into the crack.

Press your palm (thumbs up) against one side of the crack, and your elbow and shoulder against the other side. Use the opposing force to get a secure jam.

The other hand can gaston the outer edge of the crack. Grab it with your thumb down and elbow out, then pull away from yourself.

arm bar crack climbing

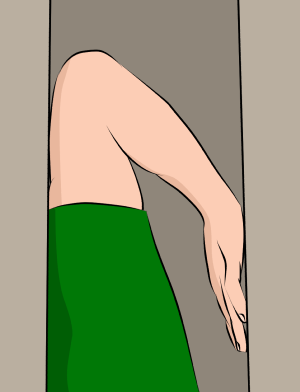
Chicken-Wing
Place your arm into the crack, elbow first, with your arm bent and palm facing out.

Push your palm against the wall and push your triceps against the other side.

Push down and outward on your chicken-wing to cam your elbow and arm into place.

chicken wing crack climbing

Off-Width Tips

* Once you’ve wedged yourself in a wider off-width, it can be difficult to switch sides, so plan before you get in there.

* If you don’t need to switch sides, carry all your gear (belay device, chalk, cams, everything) on the side of your harness which faces out.

* If you think you might have to switch sides, it’s much better to carry your whole rack on a gear sling. Simply swing it around to the other side to keep it out of the crack.

* Make sure you have enough wide gear (large cams and
big bros) to protect the climb – many off-widths offer no other protection.

* To avoid a massive whipper, keep a cam clipped to the rope and shuffle it up as you climb. When appropriate, leave this cam behind and continue up with another clipped to the rope. Don’t forget to extend gear which is far back in the crack.

* Sometimes the crack tapers towards the back so you might be able to get a fist jam, or there may be small edges in and around the crack which make upward progress easier.

* Focus on relaxing the muscles you aren’t using to avoid unnecessary physical exertion. Rest if you find a comfortable stance, and don’t forget to breathe.

Crack Climbing > Squeeze Chimneys

Squeeze chimneys are big enough to get completely inside, but only just. One way to squirm up is to use the sidewinder technique.

To Get Set Up
- Face one of the chimney walls and turn your body diagonally so your head is only slightly higher than your feet
- Set a chicken wing with your upper arm and a reverse chicken wing with your lower arm
- Twist your upper hip forward so it opposes the pressure of your butt against the back wall
- Press your knees against the front wall and your heels against the back wall (knee bars)

To Move Up
- Pivot at the waist to move your torso up and reset the chicken wings
- Move your hips up and twist them in place
- Shuffle your feet up and reset the knee bars
- Repeat

It’s best to keep your gear hanging down on a gear sling.

Crack Climbing > Chimneys

Wider chimneys are generally easier to climb than squeezes or off-widths, but often offer no protection.

There are different methods of climbing chimneys. A standard technique is shown below.

Step 1
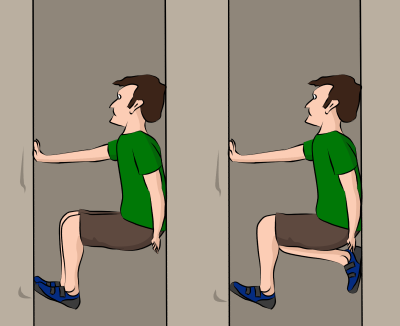
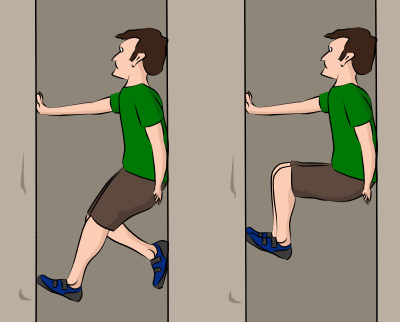
Set both feet against one chimney wall and oppose this with your back against the other.

Step 2
Set one foot against the back wall as high as you can.

how to climb chimneys

Step 3
Push up with this foot and your hands to move your body up.

Step 4
Return your foot to a higher position on the front wall and walk your other foot up to join it.

Step 5
Repeat.

chimney climbing

In a wider chimney, you may have to stem across it. Push off the left chimney wall with your hands to move your left foot up. Then alternate with the right side.

Bend your knees and keep your feet high to maintain a strong pressure on the chimney walls.

In a super wide chimney, a full-body stem may be required. With both hands on one chimney wall and both feet on the other, walk upwards. Make sure to keep three points of contact as you move up. Be warned – it’s hard to climb out of this position.

Crack Climbing > How To Make Tape Gloves

'Making Tape Gloves' is part of the book - Trad Climbing Basics.

VDiff learn to trad climb e-book book

Tape gloves protect your hands when crack climbing. There are many different ways to make tape gloves. The method described below provides a durable glove which protects well, but it covers the palm, which may make face climbing a little more awkward.

More tape is better for wider cracks, whereas thinner cracks require less. For routes which only have short crack sections, you’re probably better off without gloves.

Step 1
Starting on your palm, wrap the tape around your hand twice as shown.

Spread your fingers wide so you don’t make the glove too tight.

how to make tape gloves for rock climbing

Step 2
Using thinner strips (split the tape in half), wrap loops around each finger and your thumb.

making tape gloves for crack climbing
tape gloves for crack climbing

Step 3
Repeat step 1, but continue wrapping tape down to your wrist.

how to make tape gloves for crack climbing

VDiff trad climbing book

When you’ve finished climbing, cut the tape on the inside of your wrist and peel the glove off (shave your hands if necessary to make this less painful).

You can now re-use the gloves by adding a wrap around the wrist to hold them on. Some climbers also use spray adhesive to help re-used gloves stick.